

What is Google BigQuery Data Warehouse and How to Use It
Google BigQuery is a cloud-based enterprise data warehouse that offers fast SQL queries and interactive analysis of very large datasets. BigQuery is built on Google's Dremel technology and built to handle read-only data.
In addition to Google Analytics reports, BigQuery enables querying, processing, loading, exporting and data visualization of big data.
The platform uses a columnar storage model that enables much faster data browsing, as well as a tree architecture model that makes querying and aggregating results significantly easier and more efficient. Additionally, BigQuery is serverless and designed to be highly scalable thanks to its fast deployment cycle and on-demand pricing.
Data in BigQuery is automatically encrypted at rest or in transit.
Google BigQuery Data Warehouse Architecture
BigQuery is based on Dremel technology. Dremel has been a tool at Google for about 10 years.
Dremel: It dynamically allocates sockets to queries as needed and distributes them among multiple users querying at the same time. A single user can have thousands of sockets to run their queries. It takes more than a lot of hardware to keep your queries running fast. BigQuery requests are powered by the Dremel query engine.
Colossus: BigQuery relies on Colossus, Google's latest generation distributed file system. Every Google datacenter has its own Colossus cluster, and each Colossus cluster has enough disks to give every BigQuery user thousands of private disks at once. Colossus also handles replication, recovery (when disks fail), and distributed management.
Jupiter Network: It is the internal data center network that allows BigQuery to separate storage and computation.
Google BigQuery Setup
Thanks to the platform's expanded data capabilities – built to manage large query petabyte-scale analytics – it also means it can collect more data from different sources and organize it faster.
Also, combining BigQuery's machine learning capabilities with existing datasets and structures can improve storage design, streamline querying and data scanning, and even lower costs by eliminating redundant structures and optimizing storage for individual organization's usage patterns.
BigQuery is part of Google Cloud Platform and integrates with other GCP services and tools. BigQuery; Cloud Storage can process data stored in other GCP products, including the Cloud SQL relational database service, the Cloud Bigtable NoSQL database, Google Drive, and Google's distributed database Spanner.
You don't have to worry about the size of the storage or how much RAM is required to process your query or the number of processors on your server. The system automatically scales to run your queries and shuts down when complete. Google publishes sample databases for you to practice on.
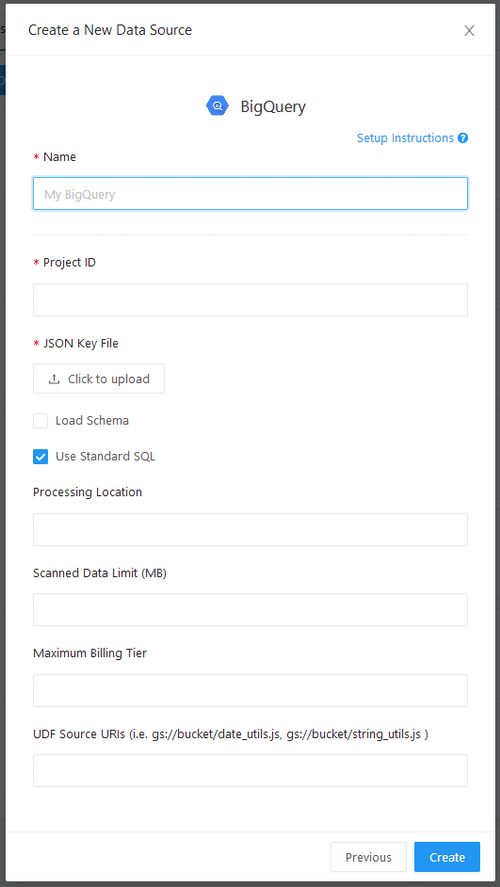
In the BigQuery datasource setup screen, the project ID and JSON key file are always required. You can get a key file when you create a new service account with Google.
BigQuery 2.0 and later supports either legacy SQL syntax or standard SQL syntax. Redash supports both, but standard SQL is the default. This preference applies at the data source level by toggling the 'use standard SQL' box. Your selection here is passed to BigQuery along with your query text. If some of your queries use legacy SQL and others use standard SQL, you can create two data sources.
If you get a job not found error similar to: Not found: Job : check if your rendering location is correct.
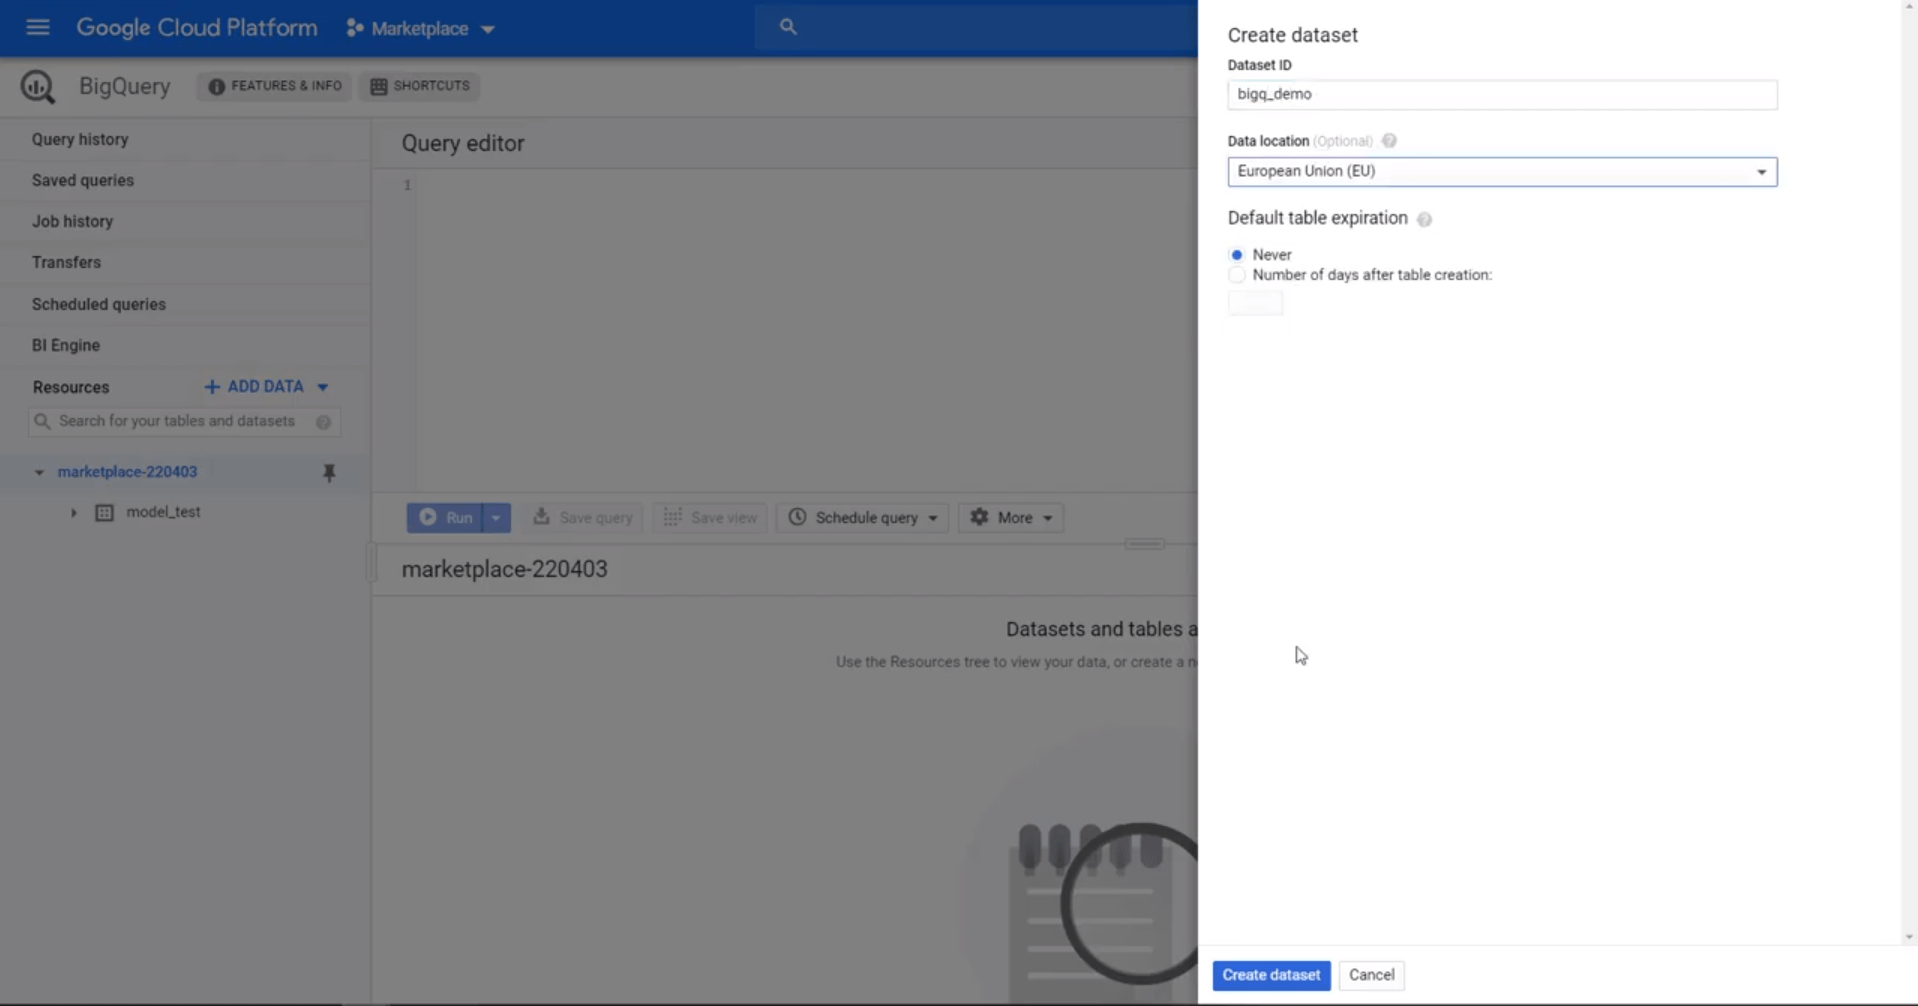
First, set up your Google Cloud Console and sign in. Select or create a project, go to BigQuery from your side menu and create a new dataset. A dataset acts as a 'folder' for your data tables that you want to load.
Under the IAM and admin menu, create a new service account with BigQuery access to manage your data and generate a JSON key to connect BigQuery to Holistics.
Save this JSON file for later. Remember to grant this account sufficient BigQuery role privileges, such as BigQuery Admin permissions.
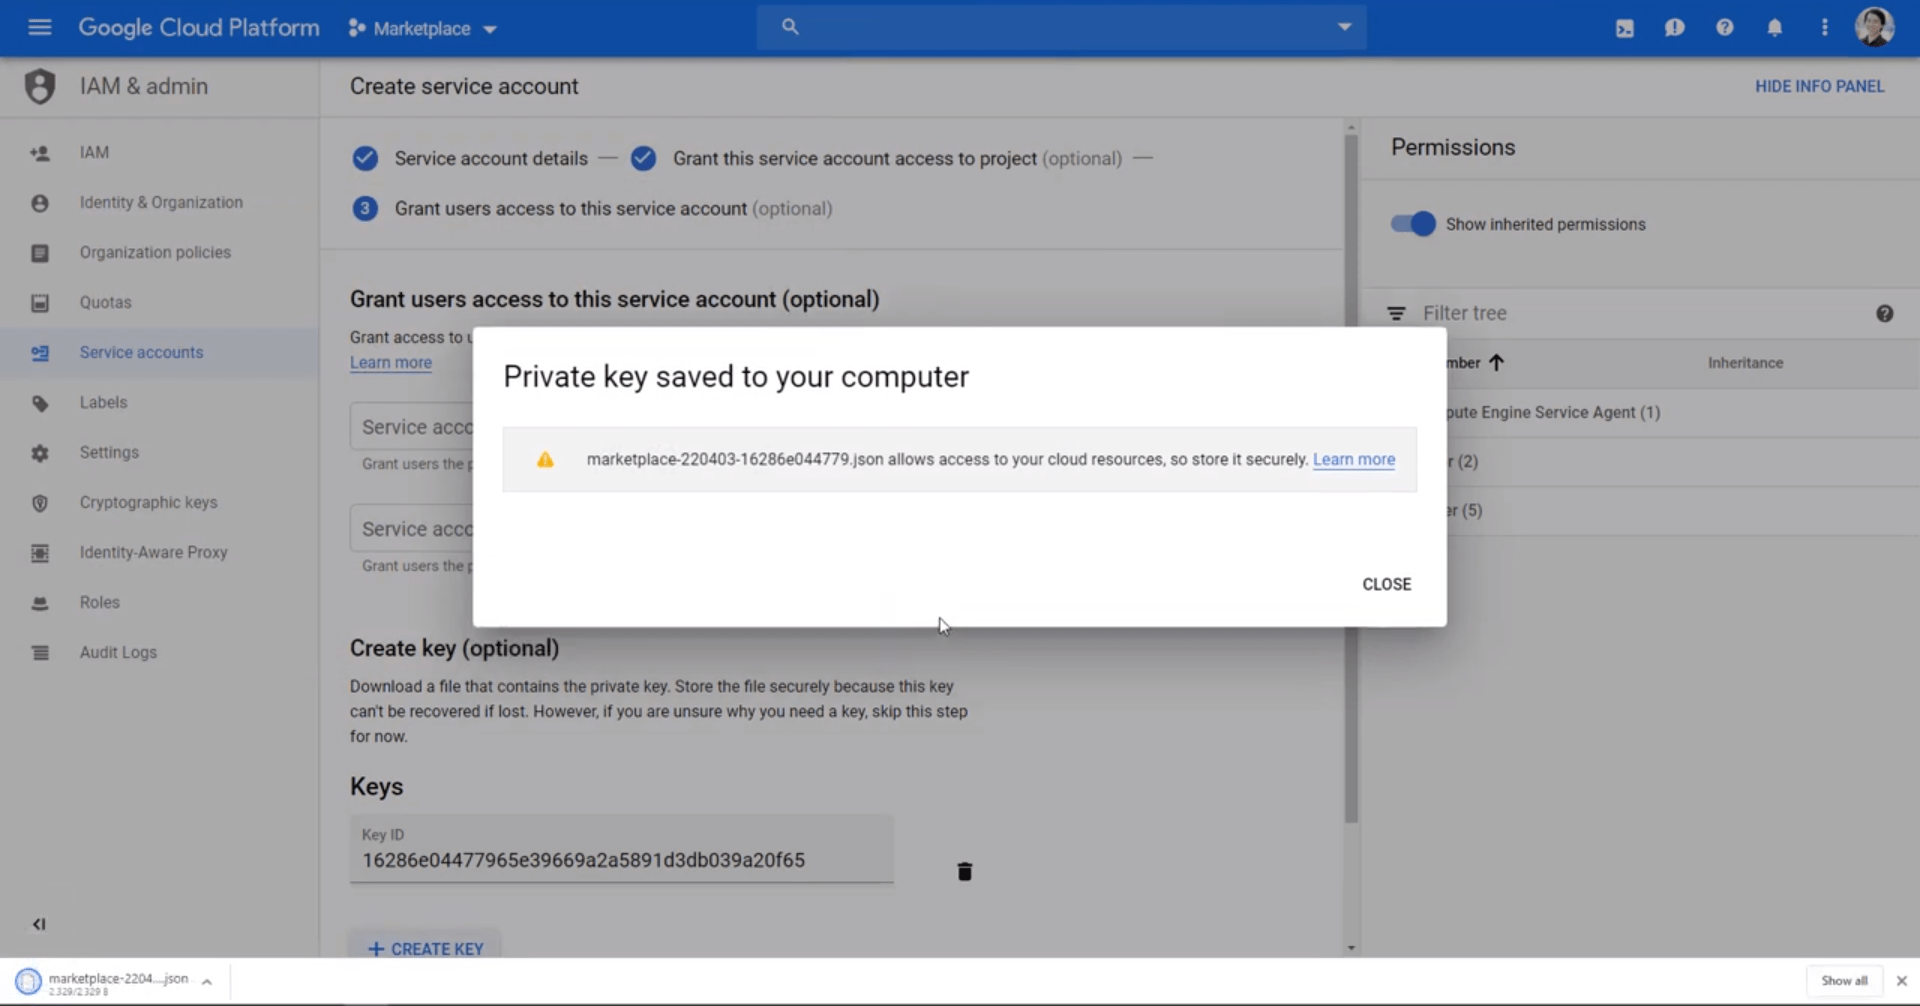
Save your JSON file from your new service account to connect BigQuery later.
Now, to add a new datasource to Holistics, select BigQuery from the drop-down menu, copy your Google project ID value from your Google console, paste the JSON key, then test and save your BigQuery datasource.

Your BigQuery data warehouse is now connected and ready!
You can now start migrating data to BigQuery for your analytics.
How to Link Google Merchant Center to Google Ads Account
Your Google Merchant Center account is the hub that connects your e-commerce site to Google Ads. Inventory, product categories, descriptions… everything Google Shopping needs to get your ads to the right people is taken directly from your Google Merchant Center account.
In fact, managing your Google Merchant Center account is just as important as managing your keywords and text ads in Ads.
Ok, Merchant Center Account created, Feed loaded. What will happen now?
To promote your products through Shopping Ads, you need to link your seller account to your Google Ads account.
The linking process needs to be initiated in your GMC account. There are 2 steps involved:
Step 1: Merchant Center Interface
Settings > Linked Accounts > Request a link from your Google Ads account to the Google Ads account > Select the correct Customer ID > Click 'Link'.
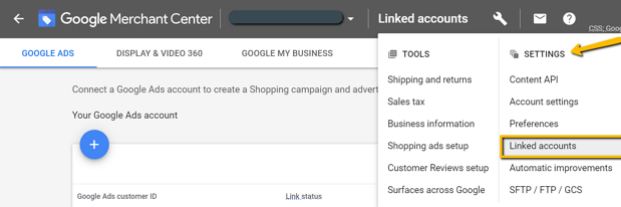
Step 2: Accept Link Request from Google Ads Interface
Go to Tools Icon > Setup > Linked Accounts > Google Merchant Center > Details > 'Confirm'.
Once your Merchant Center account is created, you will want to link it to your Ads account. Go to the drop-down menu in the upper right corner of the page by clicking the three dots.
Select 'Account Linking' from the drop-down menu. You will then be shown a suggestion to link the Ads account already linked to your email.
If you're using a separate email address for Google Merchant Center, simply click 'Link Account' at the bottom of the page and enter your Ads ID.
The next step will be to verify your website in Google Merchant Center. This is to verify that you are the owner of the website you are trying to advertise. Go to the 'Business Information' tab in the left column and select 'Website'.
Here you can link your account in one of three ways:
- Via an HTML file you upload to your site (Google claims this is the most popular method)
- Verify with Google Analytics
- with Google Tag Manager
How to Select the Country of Sale in Merchant Center?
In the process of adding your products to your Merchant Center account manually or via a data Feed, you will be asked to select your target country.
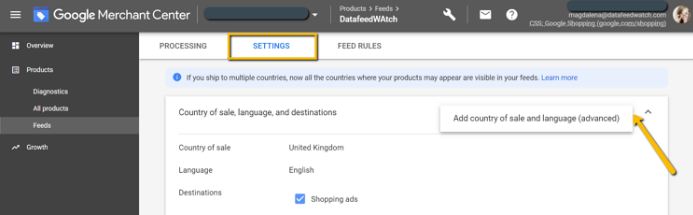
Step 1: Go to Products, then Feeds.
Step 2: Click on the name of your Product Feed.
Step 3: Go to settings.
Step 4: Click on the 3 vertically aligned dots in the upper right corner to reveal the option to add more countries.
What Happens If My Google Merchant Center Account Is Suspended?
To ensure that every user has the best possible experience, Google employees regularly review your Google Merchant Center account. If, for whatever reason, some of your products violate the Google Shopping policy, you'll be emailed a warning and given a week to fix the issues. During this one-week warning period, your ads will continue to run as usual.
If you fix all violations by the end of the warning period, you're fine. However, it's not the end of the world if you fail to clear the violations or miss the deadline. Reactivating your Google Merchant Center account is a fairly simple process.
First things first: Fix any issues that caused your account suspension, you won't be able to advertise on Google Shopping until the issue is resolved. After the process is complete, manually request a review from the Google team. If they review your account and find no issues, you're back in business. If you're still in breach, you'll have one more opportunity to request a review before you enter the cooldown period – a one-week period during which your ads are inactive and the 'Request Review' button is disabled.
How to Add Products to Google Merchant Center
There are several methods you can use to upload your products to Merchant Center:
- Import XML or txt. a feed file or a Google Spreadsheet containing your entire product catalog
- Manual upload (by adding products one by one)
- Via Content API or using FTP / SFTP
We will focus on the top 2 methods that are most popular among online retailers.
Steps to Upload Your Products to Merchant Center Via a Feed File
1) In your Merchant Center account, go to 'Products', then 'Feeds'.
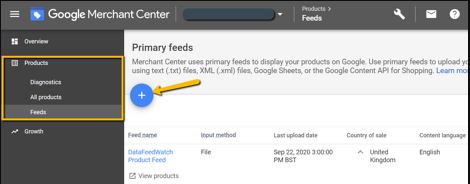
2) Click the blue plus (+) button to import your Data Feed.
3) Name your feed and choose the import method.
Using 'Scheduled Fetch' allows you to add a link to a data feed file that will be automatically checked for updates daily by Google. This way, you can ensure that your data is always up to date and relevant. You can use a feed management solution like DataFeedWatch to create a feed file under a live URL and easily optimize it.
4) Provide a link to your Data Feed and choose the best time for daily updates. Or upload a static file from your computer if you chose the 'Upload' method.
It is recommended to schedule your daily updates shortly after your Data Feed is refreshed. For DataFeedWatch users, it will come right after your scheduled daily store update.
5) Destination country, destinations etc. Provide other necessary information such as Save it.
Once saved, your product data will be processed and you will soon see a product data report in the 'Diagnostics' section.
Steps to Manually Add Your Products to Merchant Center One by One
1) In your Merchant Center account, go to 'Products', then 'All Products'.
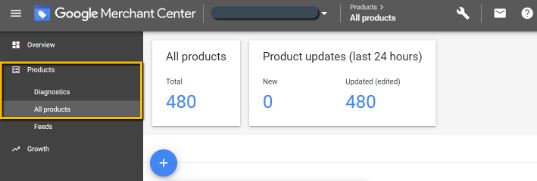
2) Click the blue plus (+) button to add a product.
3) Provide and record all required product information.
One disadvantage of the manual method is that it takes a lot of time if you have multiple products in your store. In addition, it requires constant manual updates. If you forget to refresh your data regularly, this can result in data errors and Google disapproval of your products and even suspension of your Merchant Center account.
How to Create a Data Feed for Google Merchant Center
To advertise your products with Google Shopping or through Google platforms (free product listings), you need a product Feed.
There are several options for online merchants to create a product Feed for Google Merchant Center.
1) Automate Data Flow Creation and Optimization
You can easily create a custom product Feed in minutes using a Feed management software. This method usually offers the most flexibility and space to scale your campaigns.
2) Direct API Connection
Some e-commerce platforms (Shopify is one of them) have a direct API connection with Google Merchant Center. With this method, your product data will be automatically sent to GMC and updated regularly.
It's fast and easy.
The downside is that the full product data configurations from your store are imported into Google. In other words, the product data you submit to GMC may not be specifically tailored to recommended practices and algorithms.
3) Data Transfer from Your Store
Most shopping carts offer the option to export your product information to a feed file to export the data on a single data export basis or under a constantly updated live URL.
As before, the product data in the Feed reflects a 1-for-1 store setup, which may not be the most advantageous configuration for your Shopping Ads.
Google Merchant Center Diagnostics
Once your Data Feed is uploaded, you have a good chance of discovering many errors, such as missing product numbers, missing categories, or incorrect data formats.
There is a special section called 'Diagnostics' in the Google Merchant Center to address these issues. It will tell you exactly what and where all the problems are.
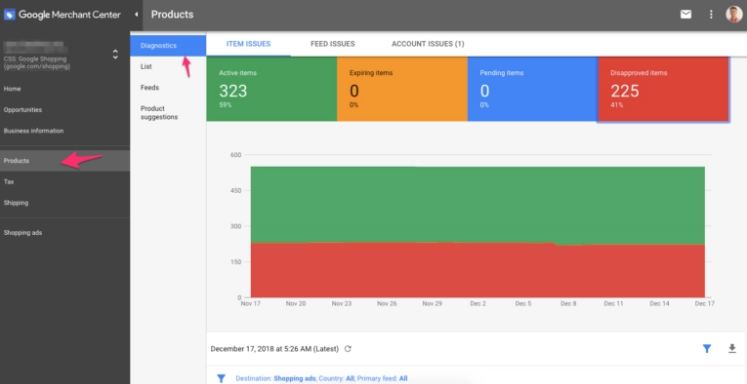
You will see two types of problems: errors and warnings.
Errors are things you must fix before they appear in Shopping results. Alerts mean that ads for these products may still show, but will have limited visibility.
So while bugs are even necessary to show up, alerts are where you can make a difference and maximize the potential of the products in your Feed.
Let's take a look at the 3 different problem levels you'll find in Diagnostics.
1. Account Issues
Account issues affect your entire Google Merchant Center account.
These are the most basic issues in your account, such as the link between Google Ads and GMC, URL validation issues, or policy violations.
2. Feed Issues
If there are any issues with uploading, fetching or validating your Product Feeds, you will see errors and warnings in the Feed level section.
The most common issues are missing credentials, file format issues, or an expired feed.
3. Item Issues
These are often missing or incorrect features or policy violations (such as a different product price in your Feed compared to your store) or incorrect stock/out of stock processing.
Numerous errors pop up if you forget a certain attribute for all products in your feed. Normally you have to fix them one by one. You can fix these issues in bulk with Feed Rules.
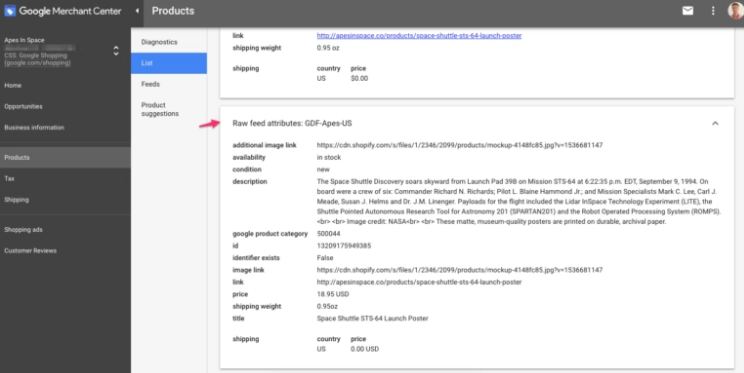
Clue: Check the Products > Listing section in Google Merchant Center and click one of the products you see there. Then expand the 'Raw Feed Properties' section to see the actual information included in your product Feed.
Feed Rules
One of the least known features of Google Merchant Center is Feed Rules.
These rules allow you to add or change certain information in the data stream from your e-commerce platform:
E-commerce platform > Google Merchant Center > Feed Rules > Google Ads
Making minor changes to your data is ideal.
It is useful to use Feed rules in the following situations:
- If you have few products,
- If you don't need to make too many changes,
- If you only use your feed to advertise on Google Shopping.
With Google Merchant Center Feed Rules, you can:
- Fix bugs in your Shopping Feed.
- Make bulk changes to your feed.
- Private labels etc. Optimize your Feed with
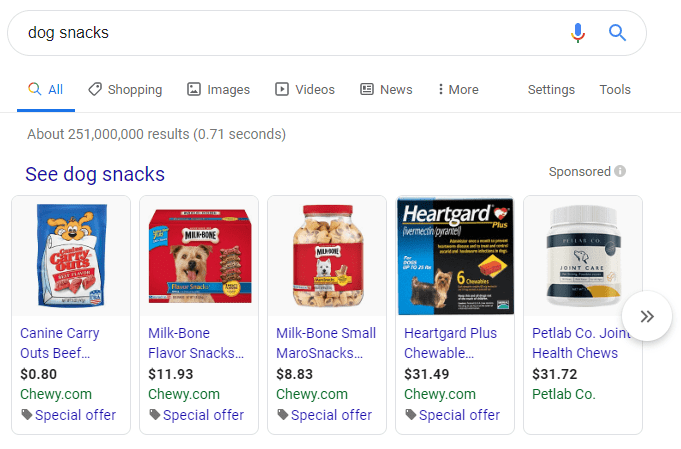
Seller Promotions
Merchant Promotions allow you to show special deals or offers directly in your Google Shopping ads. It is a type of ad extension for Shopping Ads.
You must provide the details, but their future is not guaranteed. If the promotion happens, your post looks like this:
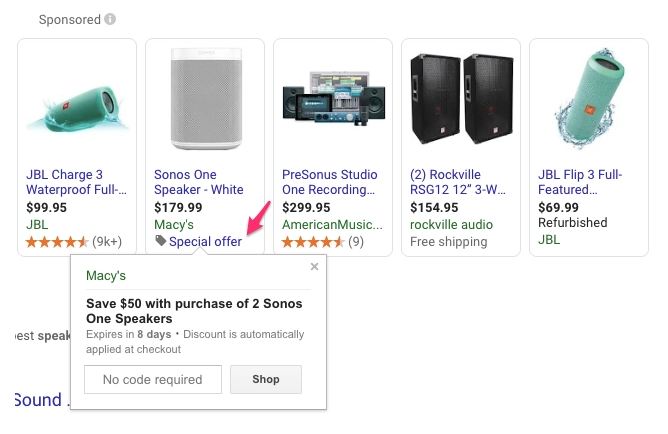
Note that Seller Promotion is different from 'Free Shipping' or 'Price Drop' notifications.
Finally, Merchant Promotions are currently only supported for advertisers in Australia, Germany, France, UK, India, and the US.
What is Google Merchant Center?
Google Ads doesn't know what you're selling, whether it's in stock, or how much you charge for a particular product. You must 'feed' Google with this information. To provide all this information to Google, you must have a Google Merchant Center account.
Using your Merchant Center account, you can upload a shopping Feed with information about all the products you want to sell (availability, price, color, etc.). This tells Google what's in your product catalog and what information should be in your ads.
Google Merchant Center is an online dashboard where online businesses manage their appearance on all Google e-commerce products and make changes to their online listings as needed.
The primary purpose of Google Merchant Center is to allow businesses to upload and maintain product information, including images and prices, for display in relevant Google Shopping searches. Google Merchant Center also integrates with other Google services such as Google My Business to allow robust oversight and control of Google-based marketing and e-commerce.
Merchant Center also serves as a source of information for free, organic product listings that Google recently offered on the Google Shopping Tab.

Manage All Google Interactions
After successfully completing a business setup process, Google Merchant Center – along with connected services – provides several benefits.
Correct Google Shopping Lists: Buyers searching for products on Google will see the business' offers in a catalog-like format, increasing visibility.
Google Ads Integration: Every product in Google Merchant Center can be linked to specific Ads ads quickly and easily. Remarketing techniques can also be used to remind visitors of previously viewed products.
Google Analytics Support: Analytics users can add a custom segment that keeps their statistics separate from other targets specifically for Google Merchant Center targeting.
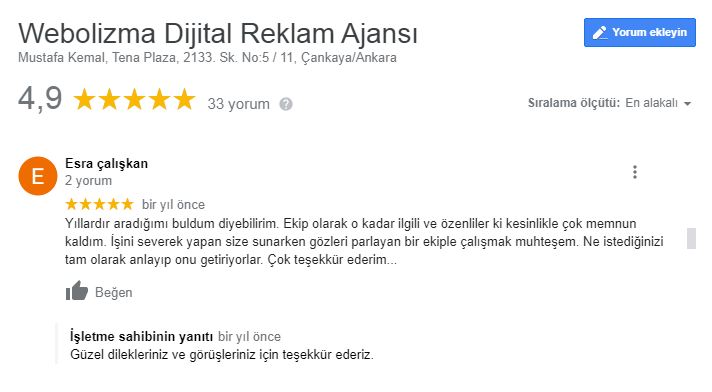
Online Product Reviews: Public reviews of products are integrated into listings, with star ratings appearing as part of the listings. 4.5 and 5 star products receive preferential placement.
Direct Website Funnels: Buyers who click on public listings can be taken directly to the shop page on an e-commerce site.
Google Local Search Integration: Entries can include geotagging that directs buyers to nearby local stores.
How Google Merchant Center Works
- You will need a Google Account to be able to create a Merchant Center Account. If you already have an account (like a Gmail account or a Google My Business account), you can use it.
- Requires a verified website and business within Google My Business, which requires compliance with various Google guidelines, such as a valid physical address, contact number, technical support, and providing a secure payment process.
- Next, you must provide your product information in a format that meets Google's Feed requirements. Some of the attributes you should include for each product in your Data Feed are a unique product ID, title, a link to the product on your website, price, a link to an image for the product, and a description. Requires full product data, including pricing, availability, and shipping information in a Google-acceptable format, such as TXT or XML files derived from Excel spreadsheets. In some cases, it is also possible to import product data from an existing e-commerce platform.
- To run Shopping Ads, you need to link your Google Merchant Center account to your Google Ads account.
- The integration offered by the e-commerce platform must be done to synchronize all the data required by GMC.
Does Google Merchant Center Have Any Cost?
The Google Merchant Center (GMC) account is free to set up and use. While advertisers can choose to use it exclusively for free product listings in the Google Shopping tab, the primary reason for having a GMC account is usually to run Shopping Ads (a paid form of product ads).
If you run Google Shopping Ads, you will be billed through your Google Ads account.
What Is Google Merchant Center Used For?
In short, Google Merchant Center is used to support your Google Shopping campaigns, local inventory ads and Shopping Actions promotions.
Google Shopping
As I mentioned in the introduction, although Google Merchant Center has been discontinued in Turkey, it is best known for its link to Google Shopping. You cannot run Google Shopping campaigns without up-to-date and optimized product information stored in Google Merchant Center.
Local Inventory Ads
Your Google Merchant Center account is for more than shopping campaigns; It can also be used to support local inventory ads. With a local inventory ad, you can let willing shoppers know that they can find the products they're looking for in a nearby real-life store.
Shopping Actions
The last use of Google Merchant Center I want to talk about is Shopping Actions. In Google's description, Shopping Actions is a 'shopping program that allows retailers to showcase their products across different Google platforms and provides a seamless experience for consumers using a shareable list, universal shopping cart and instant checkout'. Basically, by joining the Shopping Actions program, you have the power to sell products on Google Shopping, Google Images, YouTube and voice search.
Benefits of Google Merchant Center
A Merchant Center account provides an important advantage: it is a gateway to advertise your products with Google Shopping. It allows you to store essential product information needed to create your product ads and present them to potential customers.
Without Google Merchant Center (GMC), your products won't appear on Google Shopping. Also, you cannot create Product Ads unless you have added sufficient product information to your GMC account.
If you sell products directly to consumers, Google Merchant Center is one of the tools you need. It should be an integral part of your overall digital marketing strategy.
Feed Basics
After verifying your website, you need to submit your Google Shopping Feed (a list of all your product details).
There are three ways to do this:
Option 1: Plugin / Extension / Application
If you're running your store on a popular platform like Shopify or WooCommerce, you'll have plenty of alternatives to choose from.
Some of these tools will use the Google Merchant Center API. It simply means that your product data will be automatically transferred to the right place. If your app doesn't connect to GMC, you'll likely get a feed URL.
Option 2: Upload Your Own Feed
If you need to upload your own Feed to Google Merchant Center, you must ensure that you submit all values correctly.
Clue: If you're using manual upload or Google Sheets, I highly recommend starting with a test Feed. If you use the standard feed and are a little slow to fix any errors that come up, you risk getting your account suspended.
The test data Feed allows you to discover bugs and fix them before everything is 'submitted for real'. Afterwards, simply upload it to the standard Feed.
Option 3: Google Sheets
This last option is the most manual. Google Merchant Center provides a product Feed template with some instructions on how to fill in all your information.

I would recommend this for smaller online stores with a few products that rarely change, as you will need to update this file every time a product changes.
One of the most important things about your Data Feed is keeping it up to date. So choosing an option (1 or 2) that does this automatically is a huge advantage.
Shipping Settings
In addition to uploading your Product Feed, you'll also need to provide Google Merchant Center with details about your store's shipping and tax settings.
You can do this at the product level or store-wide. Keep in mind that you'll only need to make one change if something changes, such as a free shipping promotion or new free shipping minimums.
Make sure you keep this up to date. Because the shipping fee or free shipping notification can appear in every ad. So if there is still outdated information out there, you may be attracting clicks from your competitors.
Take a look at the ranking of the Google Shopping ad below:
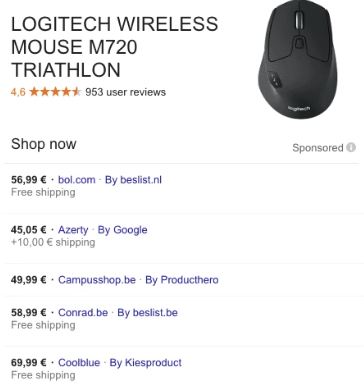
Prices are quite different, but beware of the impact of 'Free Shipping' and '+10€ Shipping'. These are very likely to affect where someone clicks.
Go to Shipping settings in Google Merchant Center and verify that the information is up to date:
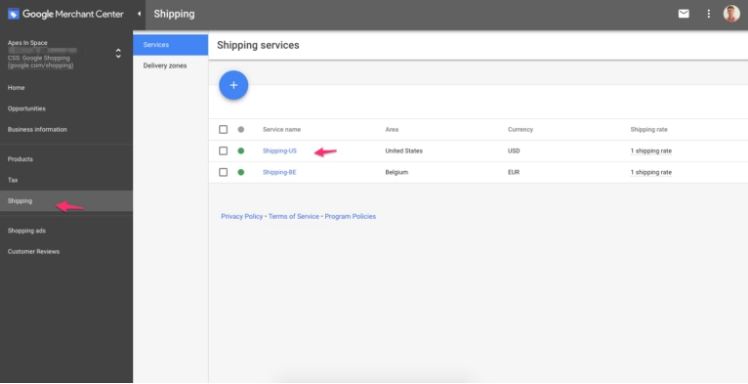
For tax settings, click 'Tax' in the left-hand navigation menu: The good news is that you only need to set rules for states where you charge sales tax (usually states where you only have a physical store).
Depending on the complexity of your shipping rules, shipping settings may require a bit more work. Click 'Submission' in the left-hand navigation, as Google will not allow you to run any shopping campaigns until you add this information.
How to Optimize Google My Business for More Sales?
1. Ask for (and Reply to) Reviews
Reviews are the lifeblood of local research.
This is a really simple equation:
Good reviews = sales. Better reviews = more sales.
Bad reviews can also present you with an opportunity. Whether you're a national company or a local florist, it's important to reach out and acknowledge all your customers' experiences with your brand.
Hemen hemen herkes ikinci bir görüşü sever. Bu yüzden insanların%90’ı satın almadan önce yorumları okuyor.
If your reviews come with a perfect 5 stars, this is your opportunity to turn a customer into a passionate supporter of your business.
Engaging by responding to customers' reviews shows that your business values their customers and the feedback they leave on it.
It also increases the visibility of your business in search results.
Encourage customers to leave feedback by creating a link they can click to write a review for your business.
2. Talk Directly to Your Customers with Google My Business Messages
Aslında, bir araştırmaya göre iş potansiyellerinin %90’ı bir telefon görüşmesi yerine kısa mesaj almayı tercih ediyor.
That's why mobile messaging can be a highly effective part of your marketing strategy. It can increase customer engagement and help complete the sale.
Google introduced the messaging feature as a solution. Now you can enable this feature and engage with your customers one-on-one, answer questions, check reviews and increase loyalty. By enabling Google My Business messaging, you unlock the option for customers to ask you questions via SMS text directly from your GMB list.
To do this, tap 'Customers', then 'Messages' and then 'Open via App'.
You will then be asked to enter a phone number that you will want to use to chat. Once enabled, customers can message businesses via their Business Profile with the Message button that appears. It is important to note that this phone number will not be shared publicly.
After adding your number, you will be asked to verify your number with a code sent to your phone. You will have full control to turn this feature on or off and you can update the number as needed.
Google also calculates a response time for you, which will be shown in your listing. This is the average of the time it took you to answer the questions. For maximum performance and visibility with the GMB listing, it is essential to keep message response time below 24 hours.
Finally, you can add a 'Welcome Message'. This is what users will get when they start sending you a message.
3. Add Posts to Share Business Updates
This is where Google posts come into play.
Google opened the post feature to all businesses in 2017. This feature allows you to share content related to your business in a variety of ways. Some examples include:
- Highlighting a new fall clothing line with various product images
- Showcasing an upcoming event you're trying to promote
- Sharing a text update on a recent company development
Google Posts lets you add text, photos, gifs, and even call-to-action buttons, including:
- Buy
- Register
- Learn more
- Reserve
- Get Offer
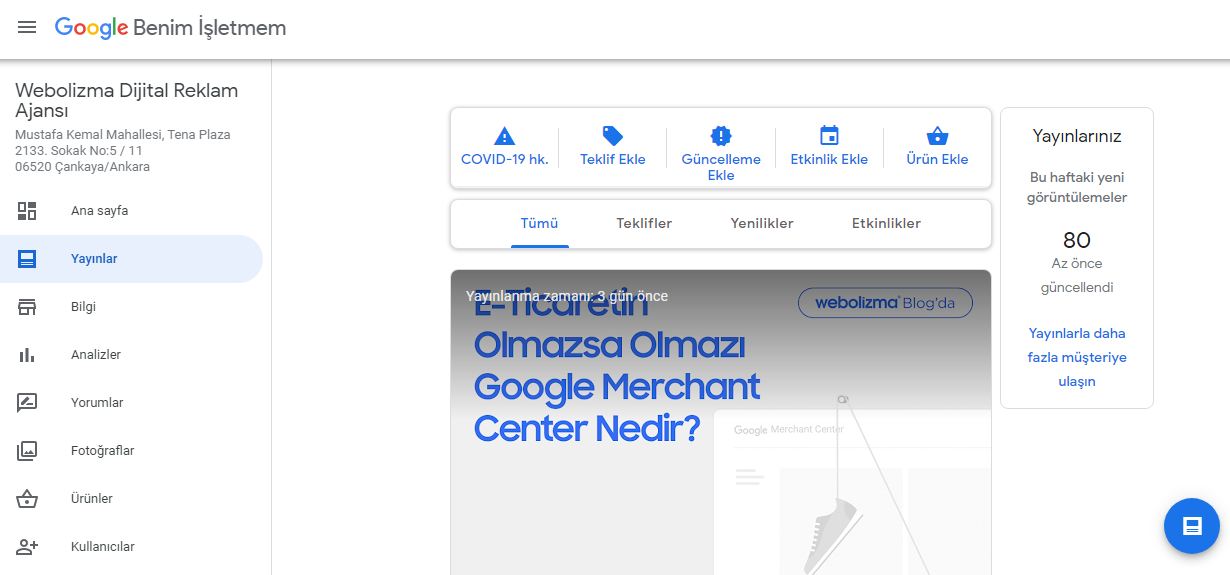
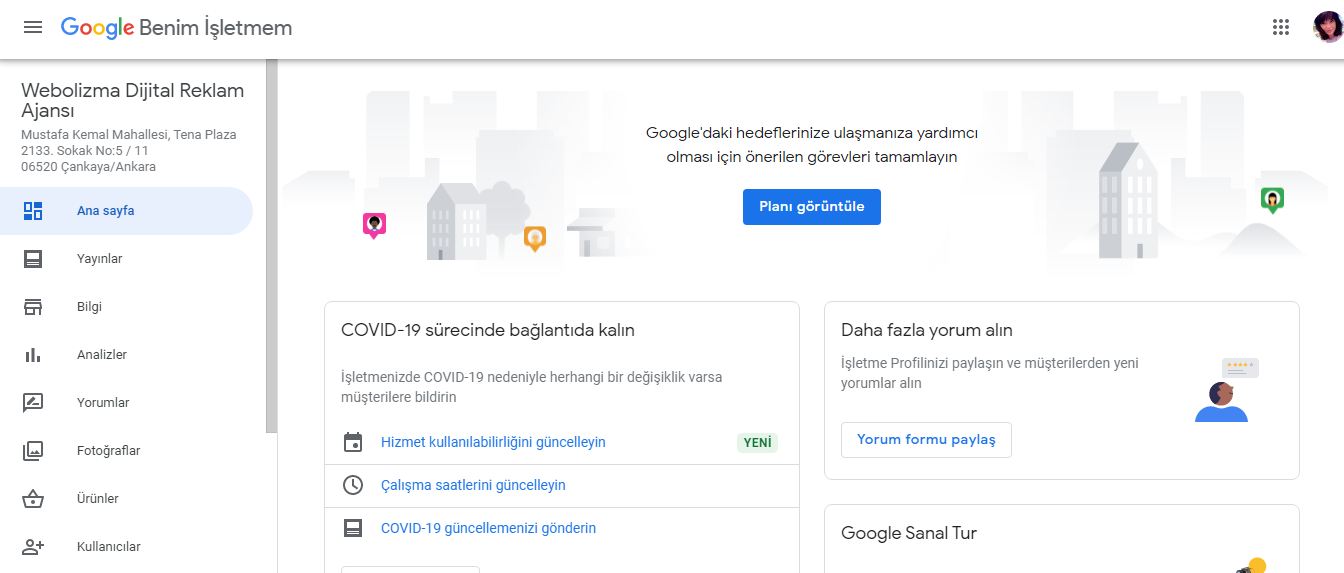
Once you've verified your Google My Business account, you can start creating posts. Once the verification is complete, your 'Posts' option will appear in the left side menu.
After clicking 'Create Post' you can add text and images.
When composing your post, you should consider:
- Google allows up to 300 words per single post, but if you use a CTA button, only 60-70 characters will appear on the mobile and desktop screen.
- All text post will be shown on mobile device if no CTA button is used.
- The image you choose should be a high-quality representation of your business. Google uses a 4:3 ratio, so the minimum required size is 400×300 pixels.
- Speak directly to your target audience. Don't use industry jargon, instead focus on sharing content that will engage your audience to engage with the post.
- Google provides insights and engagement metrics for each post, but it's also a good idea to set UTM parameters for links.
After clicking 'Publish', you can browse your post in your listing.
Google posts disappear after seven days unless you set a shorter time frame.
Use Local Posts
You can post offers, events, products and services directly to Google Search and Maps through posts on Google My Business.
Posts allow you to engage your audience and keep your Google presence fresh.
They can also be sent on the go from a phone, tablet or computer.
Here are some Google-provided tips for getting the most out of Local Posts:
- Make sure each post is of high quality – free of typos, garbled characters, gibberish, or redundant information.
- They should be respectful and not aggressive.
- The best posts contain images and links, but links should always be to trusted sites.
- Links that lead to malware, viruses, phishing or pornographic material are not allowed.
- Posts from businesses operating on regulated products and services are allowed to use posts, but cannot post content related to products.
4. Book with Google
Did you know that you can offer appointment scheduling directly through your GMB? Below the menu on the left is a 'Reservations' button. Click this button and then sign up with one of the supported scheduling providers. Google will automatically link your provider account to your GBP and your customers will be able to book appointments without even visiting your website.
Many industries can benefit from this feature, including fitness, beauty, and entertainment. Restaurants can collect orders or arrange reservations online. A booking button is a direct sales funnel in your GMB. It makes it easy for customers to connect to your service without having to pick up the phone.
Google My Business Insights
Google My Business Insights can tell you:
- How do customers find your business? (direct and exploratory calls)
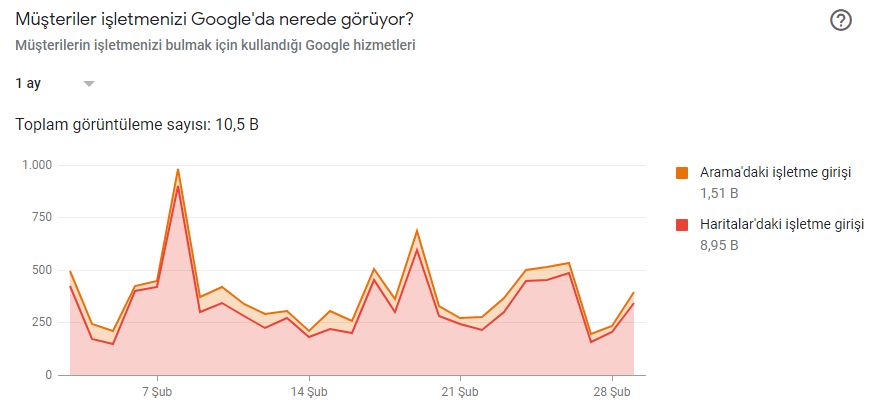
- Where on Google do your customers find your listing? (search and maps)
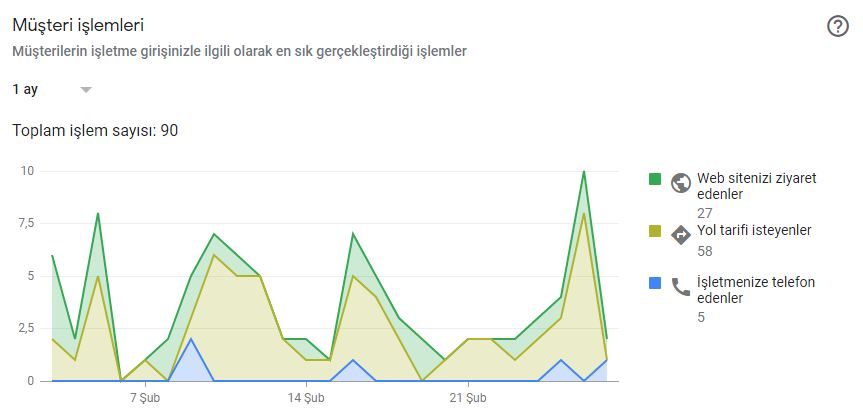
- What actions do your customers take on your listing? (visit your site, click directions, browse photo gallery, call you)
- Where do your customers live? (according to direction inquiries)
- What is the total number of phone calls and the length of time customers call?
Let's start with the most important question: How do your customers find you?
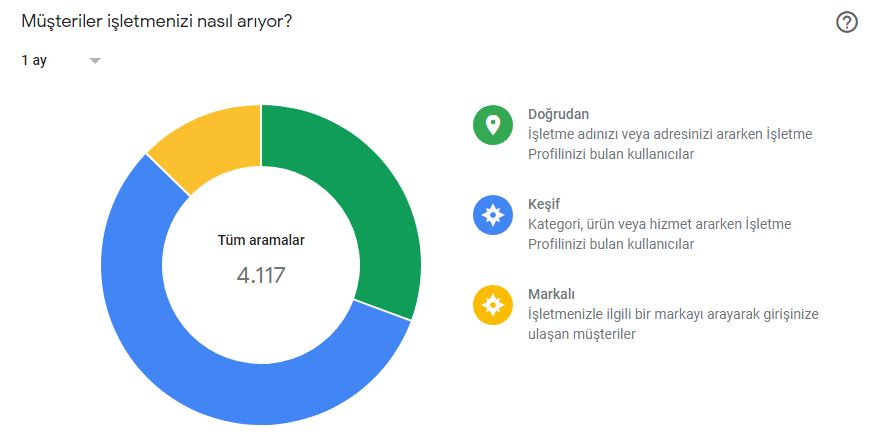
They use two types of searches: direct and exploratory.
Direct searches show your customers know your company and use your business name or address to find you. Discovery searches involve searching for a business type or category.
Once you understand how they found your listing, you'll want to understand what they're doing with it.
- Do they visit your website?
- Want directions?
- Are they looking for you?
- Are they browsing your photos?
While it's important to set UTM parameters for links, Google My Business also provides an in-depth look at what your customers are doing on your list.
%100 doğru olduğu düşünülmese de, çeşitli performans ölçümleri, GMB profilinizin ilerlediği yön hakkında iyi bir fikir verir.
There is a section on the left side menu of your GMB titled 'Insights'. Here you will find the data you need to understand how potential customers find your page and respond to your content.
Use this data to further optimize your GMB. If your images are hits, upload more. If people aren't visiting your website or searching for your business after visiting your page, you may need to add additional compelling information.
Google My Business Questions and Answers
Google Questions and Answers özelliği Ağustos 2017’de tanıtıldı, ancak büyük ölçüde yeterince kullanılmıyor. 43.000 GMB profili üzerinde yapılan bir araştırma, ‘soruların %91’inin işletme sahipleri tarafından yanıtlanmadığını’ tespit etti.
Like other GMB features, Google Questions is another opportunity to engage with consumers. Demonstrate the type of service they can expect from your team in store with informative and friendly responses.
To get the most out of this feature, post your own questions and answers to common concerns. If a question bothers you or violates Google's content policy, click the vertical three dots on the right and then hit 'Report'.

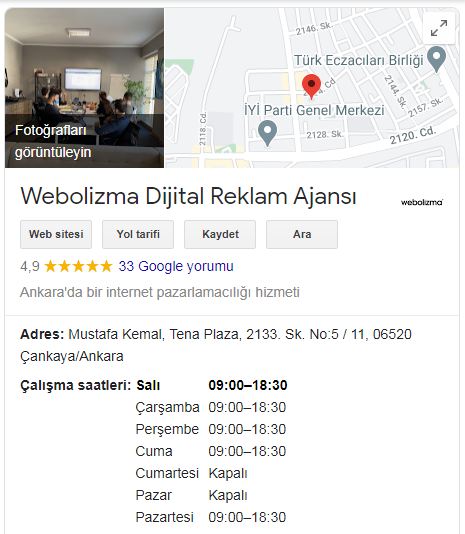
How to Claim a Business Account with Google My Business
Claiming your business on Google is one of the easiest ways to reach new customers, but you need to make sure you follow some best practices to get the most out of your listing.
Ensure Your Information Is Accurate, Comprehensive, and Up-to-Date
Local search results support the most relevant results for searches.
Make sure your listing describes what your business does, where it is, and how they can get the goods and/or services your business offers.
There are many different parts to your Google My Business listing, so let's start with your basic business information:
- Name surname
- Address
- Phone number
- Web site
- Explanation
- Category
- Attributes
Google My Business asks for your name, address, and phone number (known as NAP) to get started.

This information will be indexed by Google Search and Maps and will form the basis for your local SEO. Your information should be consistent with what is currently listed on your website. Inconsistencies in information will negatively affect your search rankings.
When entering your address, make sure it matches the correct coordinates on the map and include the postal code (5 digits – 9 digits with hyphens) provided on your website.
After providing NAP, you can focus on two important parts of your listing: your business category and your company characteristics.
These areas require you to be specific about what type of business you run.
Include Keywords
Just like traditional website SEO, Google uses a variety of signals to deliver search results.
Adding important keywords and search phrases to your business listing will be incredibly helpful, especially since your business website is listed directly on your GMB listing.
Use them in your business description and every time you publish a Local Post to your audience.
You should consider your keyword strategy when adding your business category and attributes. Be careful though. I do not recommend stuffing your listing with keywords. Google My Business prohibits such behavior.
Use Special Attributes
GMB's newer features allow disabled-owned or women-led businesses to be highlighted on their profiles.
Qualifications also allow business owners to expand the capabilities of their businesses in ways that may not be apparent from their chosen business category.
- Does your restaurant have a patio or seating area? Is it suitable for children?
- What are the amenities in your apartment complex? Tennis courts? Indoor pool?
- Does your coffee shop offer free wifi?
These features can be added to answer questions your customers are likely to have and to better describe the business's capabilities and offerings.
You will then be asked if you want to 'add a location where customers can visit, such as a store or office'. This is valuable information because many businesses operate as service area businesses. For these examples, the specific location of the business will not appear on Google Maps.
For businesses that operate in a specific service area and don't want the actual physical location to appear on Maps, select business-related service areas.
You can then add the business' contact information, including the contact phone number and current website URL.
Keep Business Hours Correct
It's important to specify your hours of operation, but it's equally important to update them whenever they change.
Google offers the ability to customize hours for holidays and other special events.
In order for your site to be accurate and keep users happy, it should always be updated.
For businesses with this location operating in a real location where people can go during working hours, you should add the business address next to it.
Once the address is determined, Google My Business will ask 'Do you serve customers outside of this location?' He will ask. If your answer is yes, you will be able to review the same service area business details.
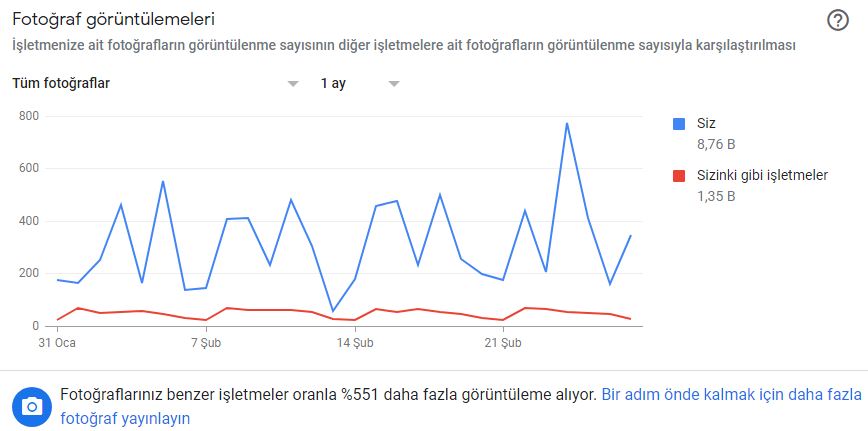
Photos
A picture speaks a thousand words.
Photos of your business and services are at the top of your GMB list, and are even more important if you have a business where appearance matters, such as a restaurant or hotel.
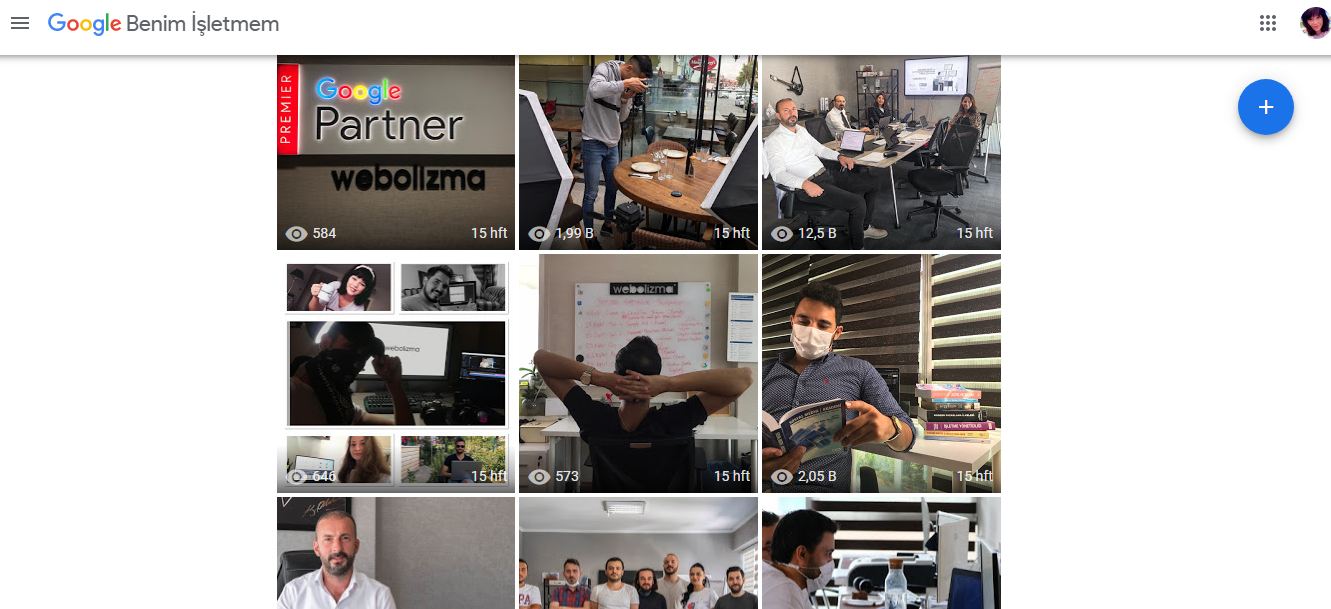
Photos from your GMB listing can be uploaded by the business owner or their customers.
Once your basics are complete, you can move on to the visual aspect of your listing and personalize it.
The first thing your customers will notice when searching for your business? Your profile picture.
No list is complete without a photo.
Bir Synup araştırması , ‘Fotoğraflı girişlerin saygın kabul edilme ve%35 daha fazla tıklama alma olasılığının 2 kat yüksek olduğunu’ buldu.
Google My Business recommends uploading a profile photo, cover photo, and video to showcase your business.
Encouraging your customers to include photos of their interactions with your business can provide an abundance of user-generated galleries of content in your listing.
Using the new 360 degree or virtual tour is another great way to show your customers your business and allows them to experience it before they leave their homes. This works extremely well for businesses like restaurants and hotels, and evaluates the atmosphere before your customer arrives.
Verifying Your Google My Business Listing
If you've entered all the information, you now need to verify your Google My Business login.
This is done by postal card, which takes up to five business days. Google will send you a verification code postcard that you will use to verify your listing and your business will be officially live.
Alternatively, you can verify your account with your email. Once this is verified, Google will recognize the legitimacy of your business listing and will begin to rank your business higher in search results.
What is Google My Business? My Business
Google My Business (GMB) is a free tool from Google that helps business owners manage their online presence in the search engine and its growing portfolio of services.
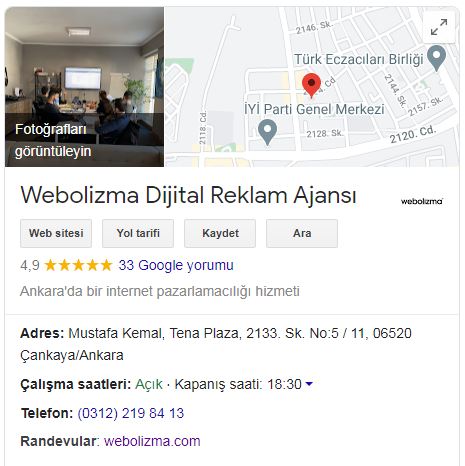
One of the simplest ways to gain traffic and customers is to claim and optimize your Google My Business (GMB) listing. Google My Business (GMB) is a list of your business's business information, reviews, posts, and more.
Creating a GMB listing is the first step to local search success:
- It helps to generate details for the database about businesses and related entities related to specific searches.
- After a new listing is created, a Google Maps location is created.
- This syncs with traditional Google Search for ease of access and searchability.
- It certainly helps that the net majority of organic searches come from Google.
- It also demonstrates the value of a GMB listing and effective local SEO.
To that end, here are a few things to consider before looking at how to claim your business on Google.
For example:
- What do your customers find when they search for your business online?
- If they need to know your phone number, how quickly can they access it?
- If they want to know if you have a parking spot, how will they find out?
While most of this information can most likely be found on your website, Google My Business will index the content you provide to ensure consistency across Google Search and Maps (Google Local Guides can also review and edit your listings for consistency).
But this isn't just a place to find basic information about your business.
Used correctly, Google My Business is a powerful tool that can increase your revenue and provide valuable insights about your customers.
Business Owners Must Use Google My Business
Google dominates search.
Net pazar payına göre, tüm aramaların yaklaşık %80’i Google’da gerçekleşiyor, günde 3,5 milyar arama yapılıyor.
In other words, your customers find what they need on the first page of Google.
While there are other ways to get your business to appear on the first page of Google, Google My Business is an extremely valuable (and easy) tool to help you:
- Check, index and view relevant business information.
- Engage with potential customers and manage your online review reputation.
- Select customer photos, videos, and other user-generated content.
- Gather insights into how your customers are reaching your site.
Signals sent from Google My Business play a big role in local SEO strategy.

What is Google Responsive Display?
Google responsive display ad, hedef kitlenizin dikkatini görsel olarak çekici bir şekilde çekmenin, görünürlüğü artırmanın ve gösterimi en üst düzeye çıkarmanın güçlü bir yoludur. Görüntülü reklamlar aracılığıyla dünya çapındaki internet kullanıcılarının %90’ına ulaşabilirsiniz.
Google display advertising; automatically generated by Google using elements you provide, such as images, titles, logos, videos, and descriptions. Based on the information you provide, Google automatically compiles your ads and adjusts their size, appearance, and format to fit almost all available ad slots in the Google display network. Responsive display ads can be used in standard and smart display campaigns.
You can use display ads to increase brand awareness to those who have not heard of you before, or you can draw attention by remarketing to those who have visited your site before.
So, what are responsive ads to display on Google? What are the differences between responsive ads and image ads? What do you need to know to create an effective and well-performing Google responsive display ad?
Differences Between Responsive Display and Display Ads
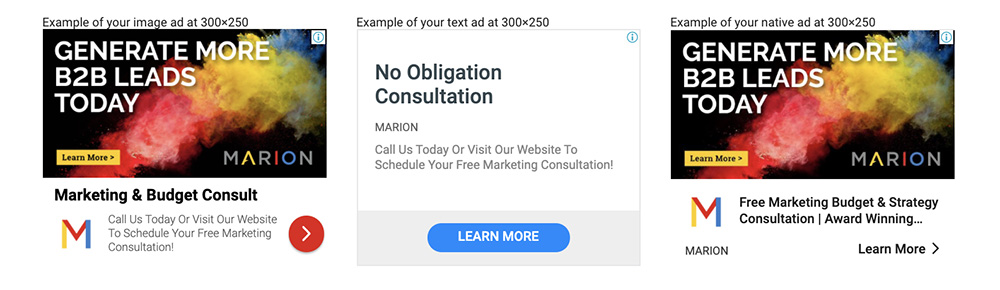
Image Dimensions
Google responsive display ads are different from their static counterparts; because responsive ads automatically adjust their size and format to fit the available ad slots. For static image ads, you need to create ads of different sizes to fit multiple ad slots. In other words, if you don't invest in lots of display ads of different sizes, you won't get as much visibility.
There are also more assets associated with responsive display ads. With static display ads, you only had to enter a final URL and upload your images. With responsive display ads, you can upload up to 15 images for a single ad that Google can choose from.
Titles
You can also add up to 5 regular titles, one long title (up to 90 characters), and up to 5 descriptions. With this, you can add more value and context to your ads than you could before.
CTAs
Google also lets you add call-to-action buttons outside of your image with responsive display ads. These often appear as a button in some ad formats. You can choose from 12 different preset options ranging from “Learn More” to “Get Quote”. You can also select (Automatic) which will let Google choose the call-to-action text for you. This is a feature not previously available in static image ads. These CTA buttons are great because they eliminate the need to add a CTA button to your image and still encourage people to take action.
Benefits of Responsive Display Ads

How to Set Up Responsive Display Ads
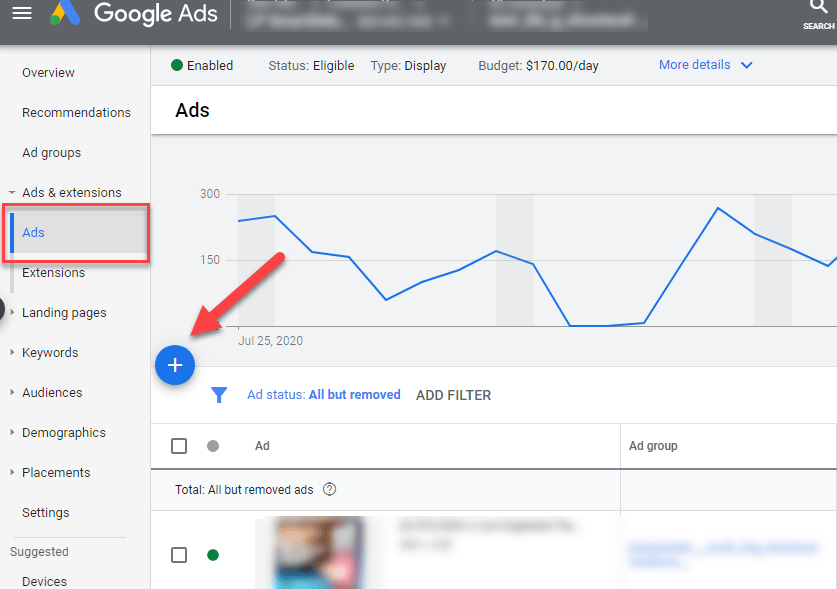
one - Google Ads Sign in to your account.
2 – Click View Campaigns and then the blue +.
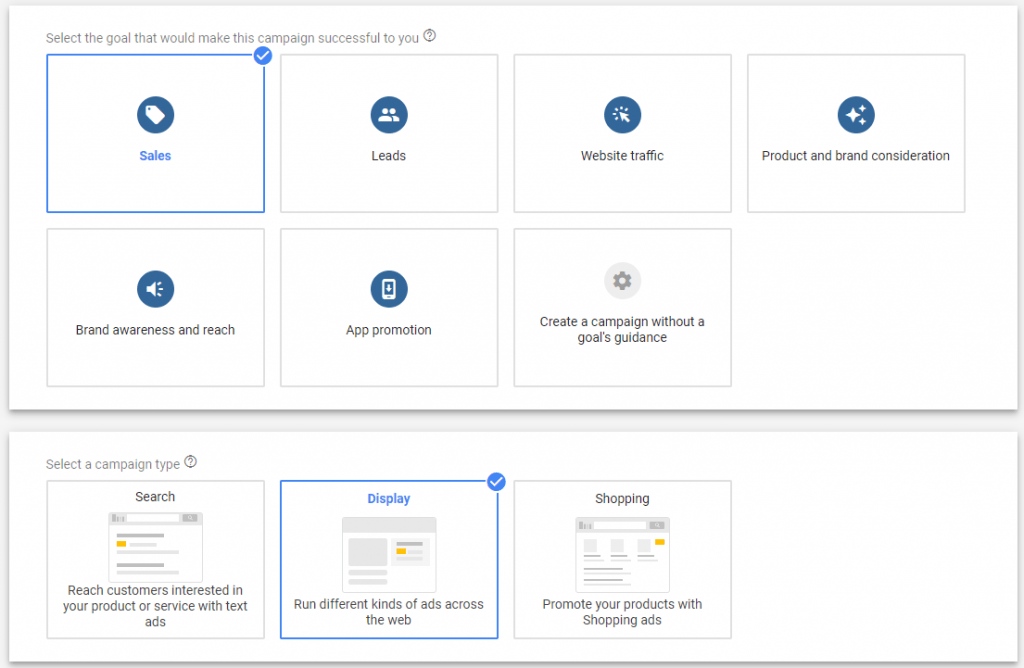
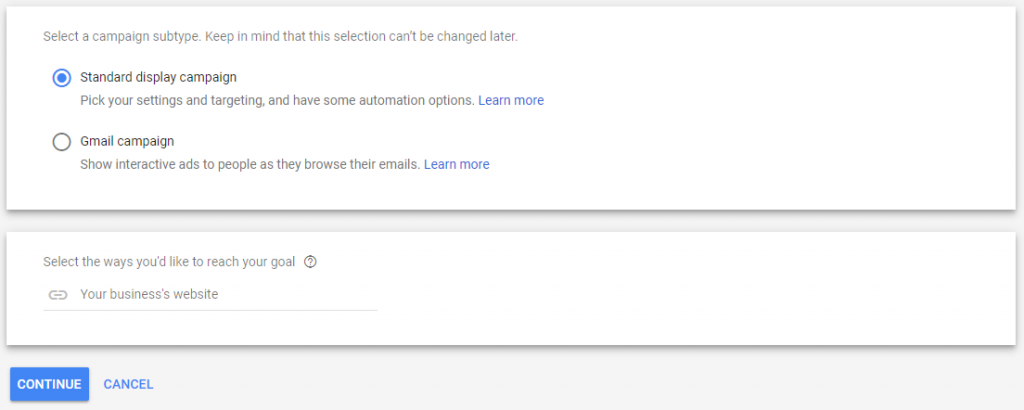
3 – Select the target of your campaign and then select the 'Display Campaign' type.
4 – Continue by selecting your campaign subtype to set up a responsive display ad. You can choose a standard display campaign or a G-Mail campaign that is shown when users browse their email. Add your business website and click Continue.
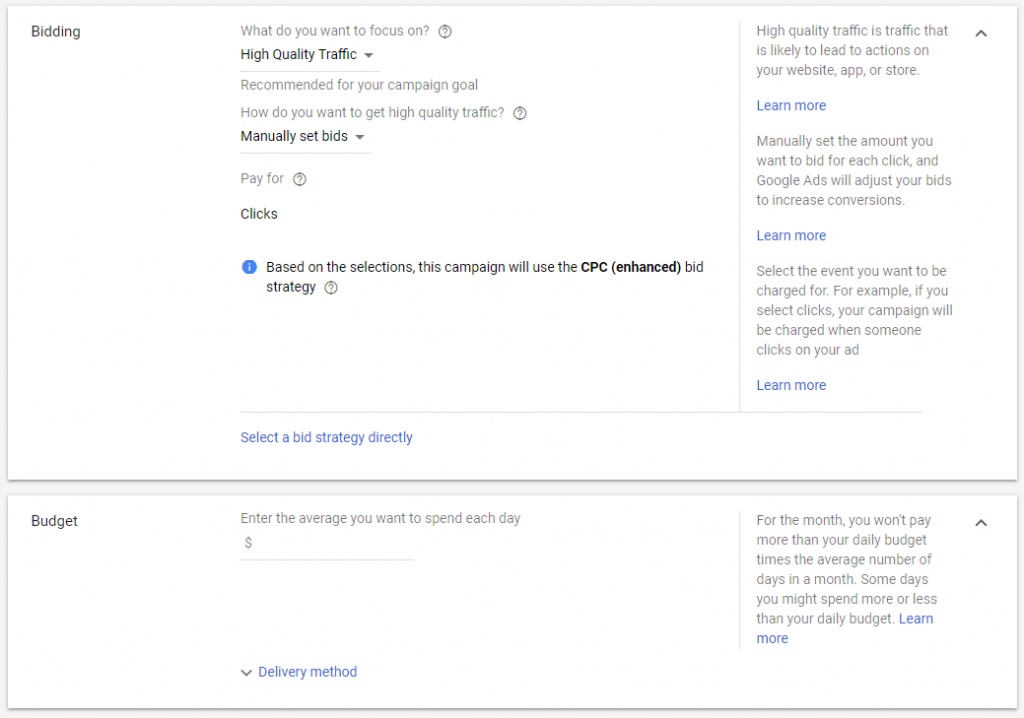
5 – On the next screen, you will name your responsive display campaign and confirm the location and language.

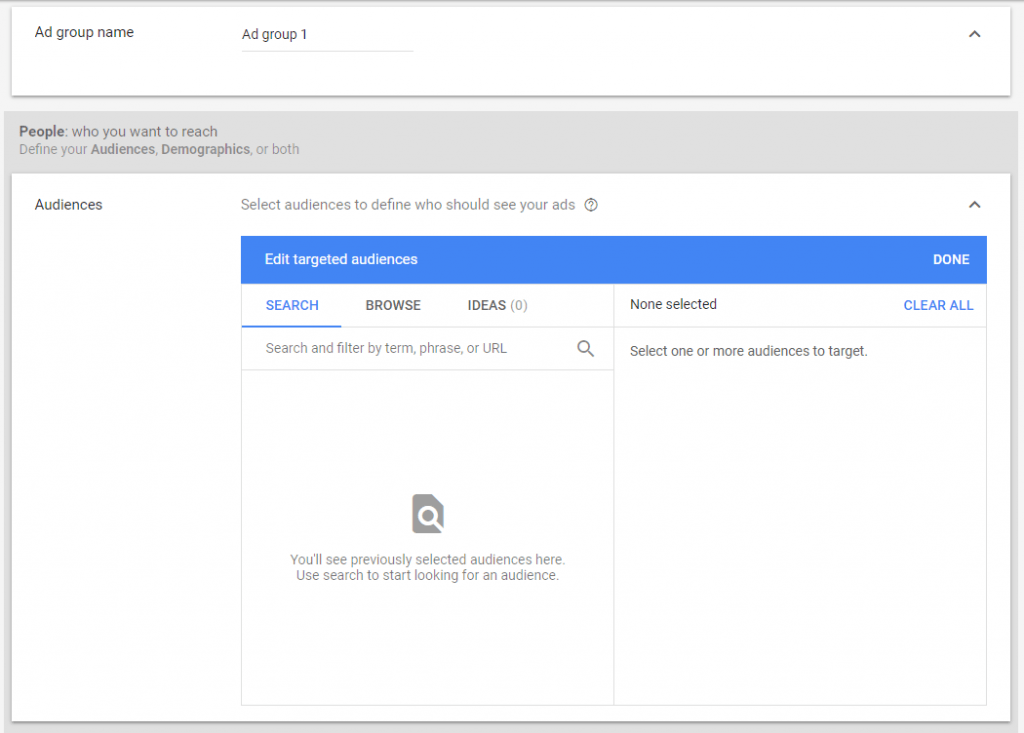
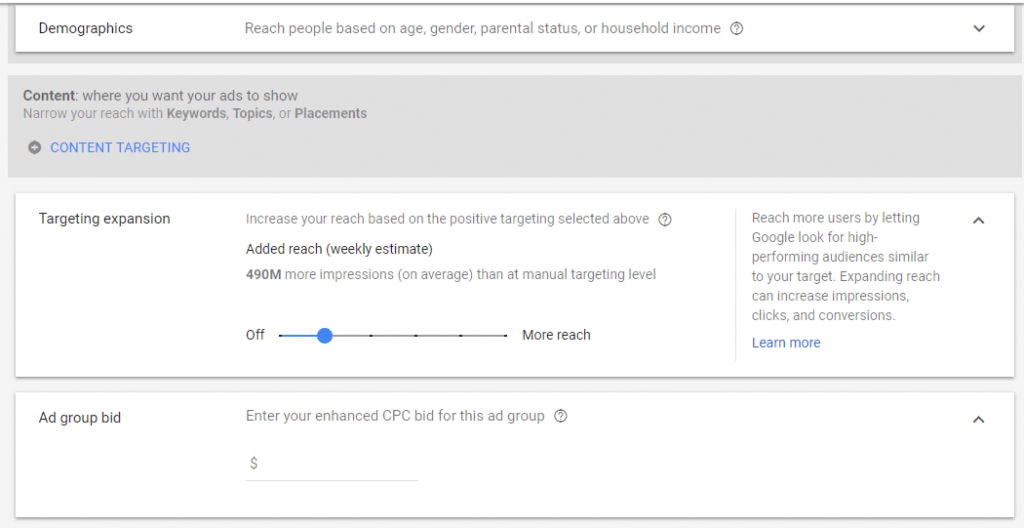
6 – You can keep the pre-filled default bid settings or make changes as needed. Next, fill in your daily budget, which is the average you want to spend on your ads each day. Name your ad group and choose your target audiences that are searchable by term, phrase or URL, or you can browse various audiences.
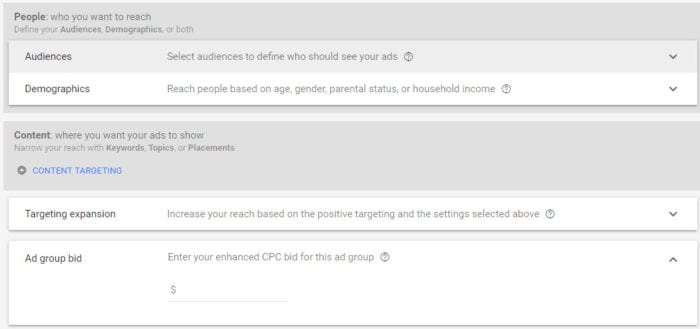
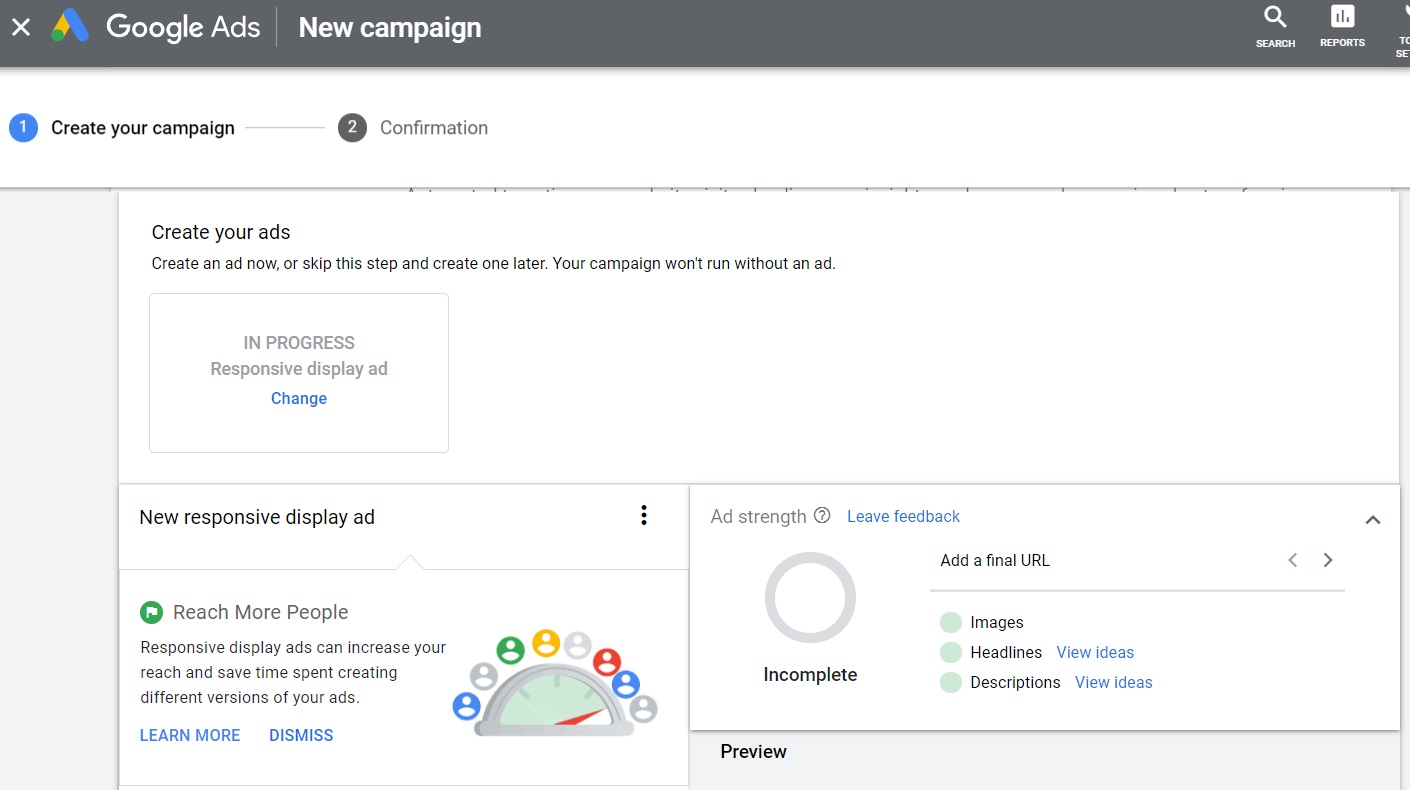
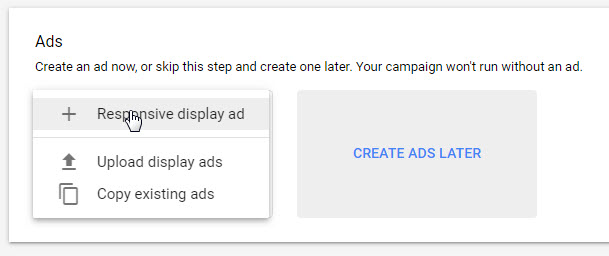
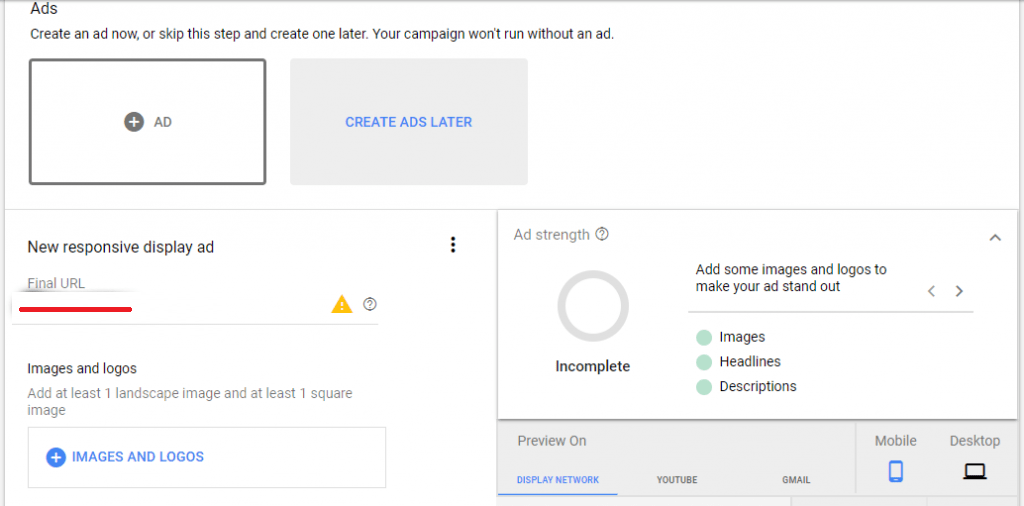
7 – You can further target potential customers by narrowing down demographics by age, gender, parental status or income. You then set your ad group bid, which is the amount you're willing to pay each time your ad is clicked.
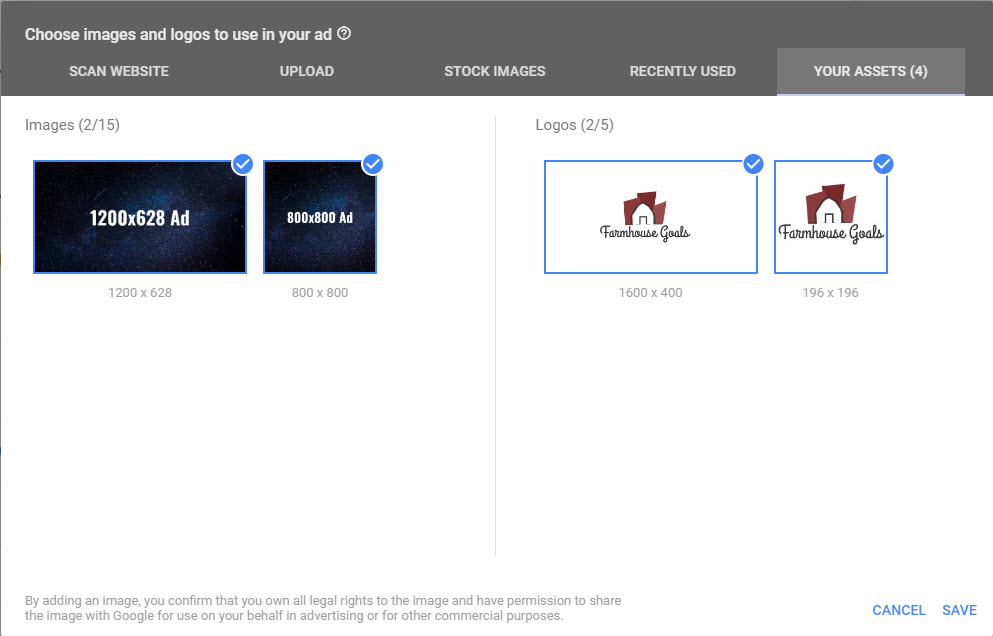
8 – You are now ready to create and upload your Responsive Display Ad. If you're not quite ready to upload your images, You Can Create Ads Later; this will save your campaign settings until you are ready. Here you will upload up to 15 images and 5 logos. Note that Google Display Ads have the following size requirements:
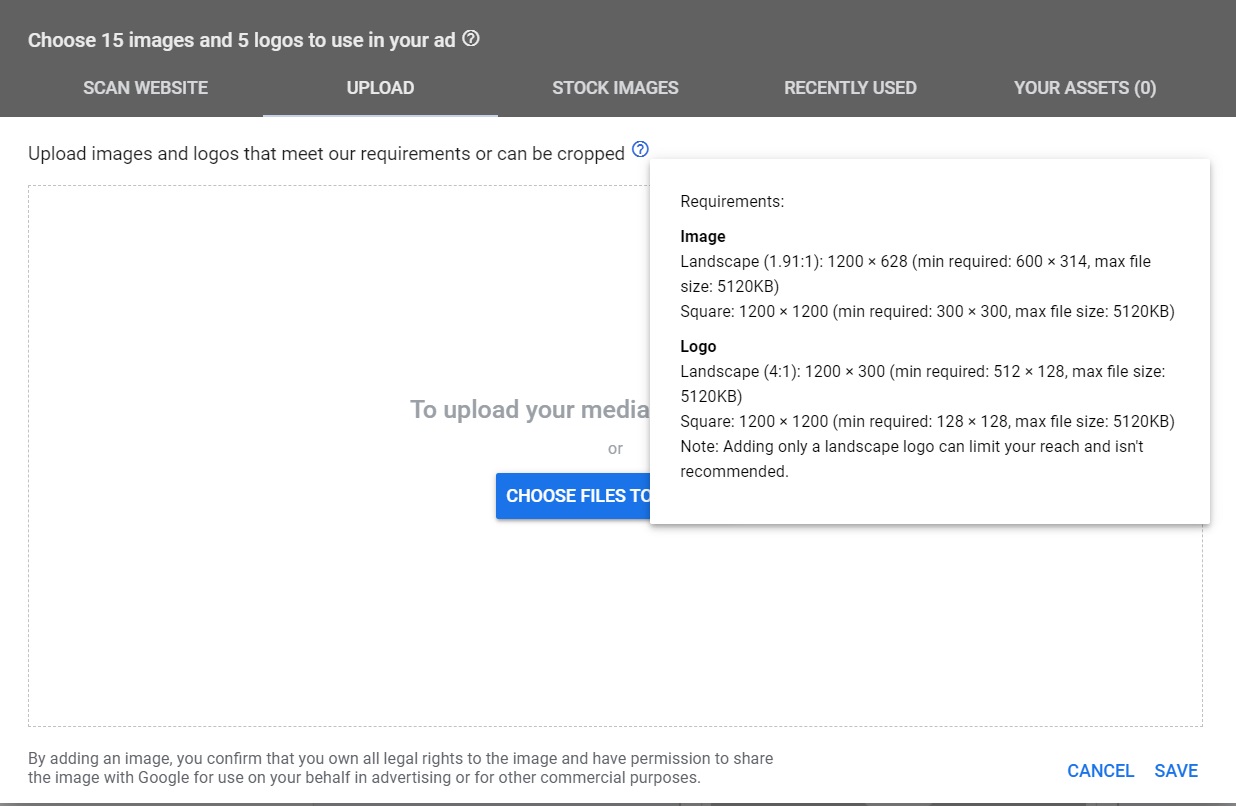
Horizontal: 1.91:1 ratio. Greater than 600 x 314. The file size limit is 5120 KB.
Square: Greater than 300 x 300. The file size limit is 5120 KB.
Logo (optional): The recommended square logo is 1200 x 1200. The recommended horizontal logo is 1200 x 300. The file size limit is 5120 KB.
9 – You can also optionally upload up to 5 marketing video ads (must be hosted on YouTube). Fill in the title, long title, description and business name. You can add up to 5 titles and up to 5 descriptions. As you fill in these fields, you'll see a preview of what your Google responsive display ad might look like on the right.
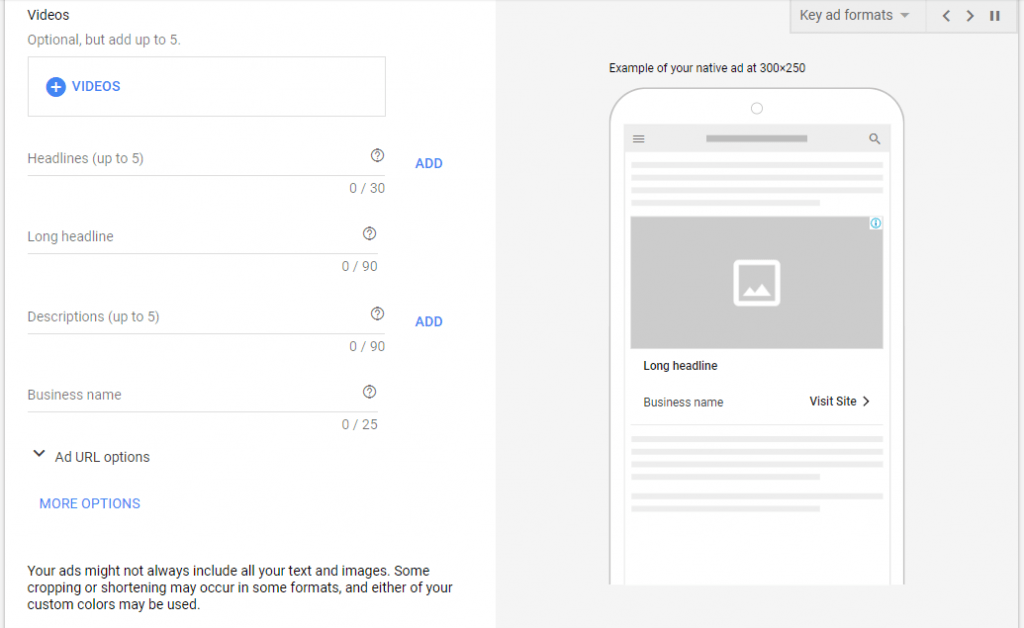
10 – Before finishing this section, be sure to click “More Options” and add a call-to-action text to your ad. For example, apply now, contact us, shop now, download, subscribe, contact us, visit the site, etc. After completing the steps, click “Add to Ad Group”.

11 – Once you are satisfied with the final ad, click “Create Campaign” at the bottom of the page.
NOTE: Your Responsive Display Ad is now live and ready to show to potential customers. You can return to Campaigns to view metrics, but you must wait at least a week for the ad to collect data.
Tips for Optimizing Your Responsive Display Ads
- When it comes to designing ads, make sure the main message/value proposition you want to convey is the featured message in the picture. The titles and descriptions are there to help provide context to the image, but it's the image that will grab people's attention first.
- Note that Google can crop the image horizontally up to %5. Make sure you have a margin around your image so your text is not cut off.
- As we mentioned earlier, you can add CTA buttons to your responsive display ads so you don't need to add them to your image if you find your image is too text-heavy. To add this feature to your responsive ads, be sure to click the blue “More Options” link at the bottom of the setup page and tick the “Call to Action” option.
- When it comes to choosing appropriate titles and descriptions, look at the content of the page you want to drive traffic to. Although display ad quality scores aren't calculated the same as Search ads, Google still looks at how relevant the landing page is compared to the text in your headlines and descriptions. The more relevant your ads are to the landing page, the higher your ads' expected CTR and lower their CPC.
- If you're currently running text ads or have posted them in the past few months, review these as well. See which ads have the highest click-through rates and analyze the top performers to identify the headlines and descriptions that people like and click on the most. The more headlines and descriptions you can add to your Google responsive display ads, the more likely the ad will perform.
1. Use 15 Images and 5 Logos
You have the option to use 1 image and 1 logo or use 15 images and 5 logos. There is no downside to testing more images and different logo colors and sizes. The best practice is to test as many ads as possible with your responsive display ads.
2. Use High Quality Images
We highly recommend uploading higher quality images, as it's easier for Google to downsize rather than enlarge them. Uploading thumbnails or low-quality images can result in blurry images and low-quality ads.
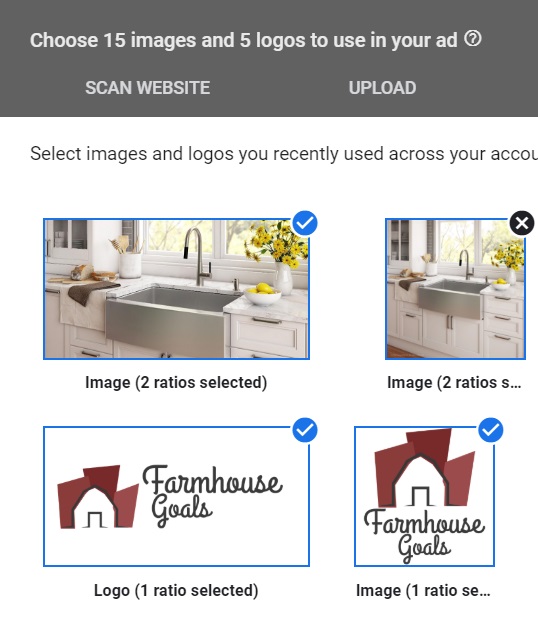
3. Use Recent Images
You also have the option to use the “Recently Used” tab; especially if you have run any Google Display Ads before. Once you have decided on an image, select “Use As”, then “Image” and click “Continue”. The same steps apply to your logo usage and selection.
4. Test Videos
Videos are optional, but you can use an existing YouTube video in your ads and it will play as part of your Display ad. Again, there is no downside to testing videos in your responsive display ads.
5. Fill in All 5 Headings and Description Lines
More text combinations mean more ads running on the Google Display Network. You can create up to 5 titles and up to 5 description lines, so you must fill in each field.
Measuring the Performance of Responsive Display Ads
Asset Performance
After you launch your Responsive Display Ads, you can view asset performance:
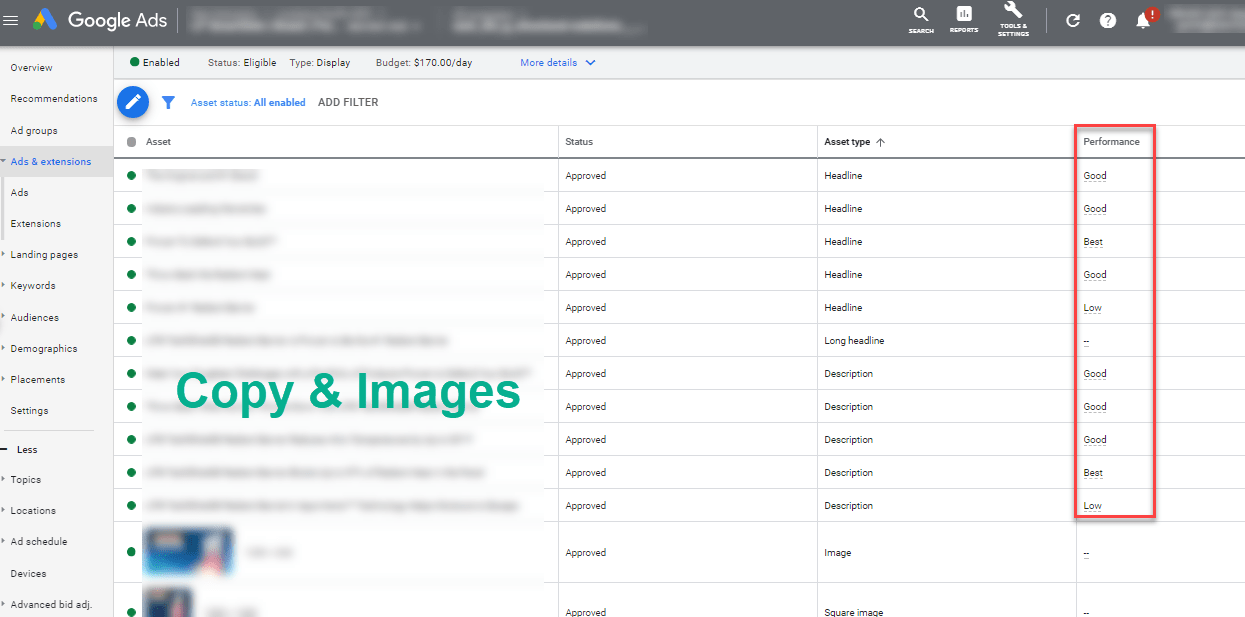
Google rates titles, descriptions, and images as good, best, or low based on historical data. Replace low-performing assets with new variations to improve RDA performance.
Incremental
In addition to asset performance, you can also measure incremental traffic and conversion driven by RDAs. Try viewing data over the period or creating an experiment to see the benefits of RDAs.
Leveraging Smart Bidding with Responsive Display Ads
Pairing Smart Ads (Responsive Search and Display Ads) with Smart Bidding enables user-level bidding and a powerful combination of creative optimization.
Conclusion
You can come across display ads on the website, mobile app, and all Google-owned platforms (E.g. YouTube and Gmail). To reach your potential customers Google Ads advertising Increase your visibility on the internet by taking advantage of our service. Google Ads has launched in November 2021 to maximize performance with its new ad campaign model. Performance Max. advertising campaignshelps you achieve your advertising goals.
The Ultimate Guide to GTINs for Amazon, e-Bay, and Google
Why is the GTIN So Important for Google Merchant Center?
Thanks to the GTIN, Google can correctly classify the product and as a result match the ad with more relevant customer queries. The more information you include in your product ads, the more likely you are to appear in relevant searches. GTINs help Google better classify your products in their catalogs and put them in front of the right consumers. This creates more potential for conversions.
If a store doesn't meet the requirement to add a GTIN, it won't enable Google ads. A missing or incorrect GTIN appears in the Diagnostics tab as one of the reasons the product was not approved. Google makes it mandatory to add a GTIN to every product by the fact that it really serves the seller. Such items may also be promoted outside of Google, for example, on YouTube or on the sites of Google's partners. GTIN indirectly improves the quality of an ad and positively affects the conversion rate.
How Product Identifiers Work
A product identifier is a number that allows you to uniquely identify your product.
The GS1 product identification system ensures that the number you assign to your product is unique. Retailers have used GS1 product identifiers (GTINs) to manage their inventory for over 40 years.
Today, with 100 million products listed online on websites and e-commerce marketplaces, this is more vital than ever. Marketplaces use product identifiers to manage product catalogs; so if your product is incorrectly numbered and has the same identifier as another product, it will cause data conflict.
If I Already Have a UPC, Do I Need to Get an EAN?
No. A UPC barcode and 12-digit GTIN do the same job as an EAN barcode and 13-digit GTIN. UPC originated in the USA but is part of the global GS1 System. So if you license UPCs from a GS1 organization, you should have no problem using them globally. When a 13-digit number is required, you can add a zero before your 12-digit GTIN.
Do I Need a Product Identifier?
Yes. If you're trading online in a marketplace like Amazon, e-Bay, or Google Shopping, you'll definitely need a barcode. All now require you to enter a product identifier when you list your product.
Why Do I Need a Product Identifier to Sell My Product Online?
When marketplaces develop their websites, they need more information about what is listed in their catalogs. As with traditional retail, knowing what to buy in e-commerce catalogs is essential to keep customers happy and sell your products.
Why Are Product Identifiers Important for Online Sellers Like eBay and Amazon?
It's a great way to improve traffic to your listings. This is because search engines like Google and Bing also use product identifiers as a way to link together information about your product in a structured way – this will get you listed in relevant search results.
Uniquely identified products also allow marketplaces to better understand what's in their catalogs. Merchandising sites like Amazon and e-Bay use product identifiers to structure product data on their websites so they can improve the shoppers' experience. It is also used to drive features such as product identifiers, product reviews, and create smarter offers for shoppers.
Types of GTINs and Differences Between them
What is GTIN?
The Global Trade Item Number (GTIN) is the name given to the number that uniquely identifies a product. In North America it is 12 digits, but in the rest of the world it is usually 13 digits long, or sometimes 8 digits for very small products.
A GTIN (Global Trade Item Number) is a product identifier code embedded in the UPC barcode required to sell products in stores or on an e-commerce platform such as Amazon.
Additionally, these product ID numbers not only help you manage inventory, but also make your product unique. Efficiently tagging and organizing products with the correct identifier helps retailers avoid data conflicts, catalog clutter and more.
GTIN Barcodes
GTIN stands for Global Business Identification Number. This refers to any barcode used in the Global Retail System. Therefore, there are several different types of barcodes. I have detailed the most common of these below:
- GTIN-12 – This, UPCDenotes -A or UPC-12 barcodes. These are used in products and are common in the USA and Canada.
- GTIN-13 – This is a EANRepresents the -13 barcode. These are the most common type of barcode used for retail and are common in all countries.
- GTIN-14 – This stands for ITF-14 or TUN Carton Codes. These are used for 6 or 12 or any number of cardboard boxes of your product and are used solely for stock tracking by the company. It is based on the UPC-A or EAN-13 barcode, so ITF-14 on the carton corresponds to EAN-13 on the product inside the box.
- ISBN – The International Standard Book Number (ISBN) is a unique trade book identifier barcode. Each ISBN code uniquely identifies a book. The ISBN is 10 or 13 digits. All ISBNs assigned after January 1, 2007 are 13 digits. Typically, the ISBN is printed on the back cover of the book.
- ASIN – Amazon Standard Identification Numbers (ASINs) are unique blocks of 10 letters and/or numbers that identify items on Amazon. The ASIN for books is the same as the ISBN number, but for all other products, a new ASIN is created when the item is uploaded to the catalog. When creating a new ASIN, you need to know your product's GTINs or Global Trade Item Numbers. The most common GTINs used are UPCs, ISBNs, and EANs. Such codes are usually found next to the barcode on the product packaging of your product. Amazon uses these universal product identifiers (GTINs) to generate and match their own unique ASIN codes.
Conclusion: GTIN is a family of numbers and includes UPCs, EANs and Shipping Container Codes.
GTINs (UPCs and EAN barcodes) are used on all products. Whether you've created a DVD, you can find clothing, food, hardware, electronics, accessories, etc. sold, you will use a UPC (or EAN) barcode for your product.
What is UPC?
UPC Number (Universal Product Code) is the name given to the standard barcode image of a 12-digit GTIN used by American and Canadian companies.
The first 6-9 digits of a UPC code are called the Company Prefix, which remains fixed on any UPC number owned. The next set of numbers that follow are the item numbers assigned to a unique item selected by the buyer. The last digit in the UPC is called the check digit, which is a calculation based on the 11 digits before it.
What is EAN?
EAN, which stands for European Article Number, is the name given to the standard barcode image that represents the 13-digit GTIN on most products you purchase from stores in the UK and worldwide, excluding North America.
What is an ISBN?
An ISBN, short for the international standard book number, is usually 10-13 digits long and is embedded in a barcode. Unlike a UPC or EAN, an ISBN uniquely identifies a book or book-like product. And as the name suggests, it can be used to refer to a title on an international level.
To get an ISBN, you need to apply for it at one of the 160 ISBN agencies around the world, such as the UABN (Universal Book Number Agency) or isbn.org.
What is JAN?
Japan also uses the same standard and calls it the Japanese Product Number (JAN). Codes used in Japan start with different numbers than those used in Europe, so they are globally unique.
What is the Difference Between EAN and UPC?
A UPC is a 12-digit barcode used in North America to identify most products. The rest of the world uses 13-digit EAN barcodes to identify products. However, both numbers and barcode types are part of the GS1 System of international standards, so both are accepted globally.
UPC, EAN, ISBN Links with GTIN
GTIN barcode numbers such as UPC or EAN are essential data structures that help business owners and companies around the world maintain and manage their catalogs.
GTIN stands for Global Trade Item Number. More specifically, a GTIN is a sequence of numbers associated with a barcode. GTIN codes are part of larger global data structures that help identify a company's unique product.
Technically, there is no difference between GTIN and UPC because they are one and the same. Likewise, UPC, EAN, and ISBN are all GTINs. This is because the GTIN is the number encoded in the UPC, EAN or ISBN barcode.
What is FNSKU?
FNSKU stands for Fulfillment Network Stock Keeping Unit, which is created when you create a product list. When you ship products to a fulfillment centre, an FNSKU must be visibly labeled on your product.
Just like a GTIN, an FNSKU is a unique set of numbers for a product that is linked to a specific barcode.
What is the Difference Between GTIN and FNSKU?
If you are just starting to sell your products on Amazon, or if you are a third-party seller or distributor selling the same products as others, you will need an FNSKU that appears on your product labels. For example, a reusable Starbucks cup.
FNSKUs are often required when selling on Amazon because ASINs (a particular product) can be sold by different vendors and/or have multiple SKUs. When a product such as the Starbucks mug is sold by more than one "additional seller," an FNSKU is what identifies both the product and the seller to Amazon's staff.
This way, if an item sold by you and other sellers is determined to be counterfeit or otherwise unsalable, Amazon can identify which seller is at fault.
If you already have a branded product on Amazon that no one else is selling, an FNSKU is not necessary as you can label your products with UPC or EAN codes.

